RSS Feed

Tag Archives: recipe

Parsnip Soup

While my friends and family in Australia are trying to cope with heat rising above 40C, we’re snuggling together under blankets to keep warm.

We’re also trying to be healthier after the usual Christmas/New Year over-indulging, and soup continues to be an easy way to get Nicholas to eat a variety of vegetables (even if sometimes he HAS to drink it through a straw!).

Parsnip SoupPARSNIP SOUP

Prep time: 10 mins
Cook time: 15-20 mins
Makes 4 adult servings

1 tbsp olive oil
1 onion, diced
2 garlic cloves, chopped
500g parsnips, peeled and roughly chopped
2 carrots, roughly chopped
1 tsp garam masala
1 litre hot vegetable or chicken stock
Salt and pepper
Handful fresh parsley, roughly chopped (optional)

Heat the olive oil in a large pot over a medium heat. Add the onion, garlic, parsnips and carrots cook for about 4 minutes until the vegetables are starting to soften.

Add the garam masala and a little salt and pepper, and cook for another minute.

Add the stock, bring to the boil then reduce the heat to medium-low. Cover and cook for 10-15 minutes until the parsnips and carrots are soft.

Take off the heat, toss in the parsley and purée until smooth (either in a food processor or using a hand blender). Check if you need to add any seasoning.

If the soup is too thick after puréeing, stir through some milk (or coconut milk).

Variations:

  • For a curried parsnip soup, replace the garam masala with curry powder
  • Add some grated ginger with the garlic for a little more zing

What dishes to you and your family eat to feel warm?

Kale Crisps

I’ve wanted to try making kale crisps for a while as they’ve intrigued me. When a large bunch of kale popped into my weekly delivered veg box, it was time to try them.

I think for a lot of people kale crisps don’t sound particularly appetising. And the first taste is a little odd, but… then I couldn’t stop eating them! Hubby was rather dubious, but… then he couldn’t stop eating them! And Nicholas tucked into them too!

Vegetable crisps

Such a brilliant way to get some more green veg into your and your little ones’ diets, and kale is considered to be one of the healthiest vegetables around. Kale crisps are also super easy to make.

Some recipes suggest putting the torn up leaves into a bag with the olive oil and salt, and either shaking or massaging to cover the leaves. I tried this the first time I made them, but found the salt didn’t spread very well meaning I ended up with some VERY salty crisps and some without any salt. If you’re not using salt at all, the bag method works well to limit the amount of oil, but otherwise I would just drizzle the oil and sprinkle over the salt once the kale is on the oven trays. Be careful about adding too much salt as they can very easily become too salty (you can always add more salt after they’ve cooked).

KALE CRISPS

Prep time: 5 mins
Cook time: 5-10 mins

1 bunch of kale, washed and patted dry
Approx. 1 tbsp olive oil
Salt (optional)

Preheat your oven to 170C and line two oven trays with baking paper.

Tear the leaves off the thick stalks and chop or tear into pieces about 5-7cm in size.

Spread the torn leaves in a single layer over the oven trays.

Lightly drizzle the leaves with olive oil and very lightly sprinkle with salt (if using).

Bake for 5-10 minutes, keeping a close eye on them, until the edges have just started to go brown.

Variations:

  • for kale crisps with a kick, sprinkle with chili powder before baking;
  • for zesty crisps, as soon as you take the crisps from the oven, grated over some lemon zest;
  • for cheesy crisps, sprinkle over some grated parmesan before baking;
  • sprinkle over some sesame seeds after baking.

Tip: if your kale browns too quickly, try baking them at 150C for 20-25 minutes.

Gingerbread

Christmas wouldn’t be Christmas without gingerbread. Whether it’s gingerbread men, a gingerbread house or other gingerbread shapes, the mix of spices and the smell of it baking makes me feel all warm and Christmas-y!

Making gingerbread with your little ones is a wonderful activity to do (and not just at Christmas time). It’s easy to make, immense fun to make shapes out of and cooks quickly so you can start decorating sooner.

If you’re cooking with toddlers, you could make the dough yourself beforehand (the dough keeps in the fridge easily for a day) and get your munchkin involved from the ‘cutting out shapes’ stage. Older kids can help make the dough from scratch and while it’s chilling in the fridge, they can start choosing cookie cutters and think about how they’ll decorate them.

Gingerbread keeps wonderfully (in an airtight container) for a couple of weeks. It’s also a lovely present your kids can make and then give to friends and family. We’ve just finished decorating some Christmas trees to give to the staff at Nicholas’ preschool.

Gingerbread Christmas treesThis recipe has been the only one I’ve used to make gingerbread for the last few years. It’s slightly adapted from a Waitrose recipe. If I remember correctly, I just reduced the amount of bicarbonate of soda, as I really don’t like it when I can taste it in the finished product. There’s still enough of it though to puff up the gingerbread a little.

To make cleaning up easier, I like to roll the gingerbread on a piece of baking paper rather than on a floured surface, with a piece of plastic wrap on the top so the rolling pin stays clean too. This also means that your gingerbread won’t accidently stick to your work surface.

Christmas

GINGERBREAD

Prep time: 20 mins
Cook time: 9 mins
Makes about 30 medium-sized biscuits

125g unsalted butter
100g dark muscovado sugar
4 tbsp golden syrup
325g plain flour
1 tsp bicarbonate of soda
3 tsp ground ginger
1 tsp ground cinnamon
1/4 tsp nutmeg

Preheat oven to 190C. Line at least two baking trays with baking paper.

Melt the butter, sugar and golden syrup in a small saucepan over a low heat, stirring occasionally. Remove from heat.

Mix the flour, bicarbonate of soda, ginger, cinnamon and nutmeg in a medium-sized mixing bowl. Stir in the melted ingredients to make a stiff dough. Shape into a ball and refrigerate for 10 mins (if you’re not going to cook your gingerbread immediately, wrap in clingfilm and leave in the fridge).

Roll out onto a lightly floured surface to a thickness of 3-5mm. Cut out shapes and place on your lined baking trays. Bake for 9 minutes until golden brown.

Leave on a wire rack to cool completely before decorating.

Store in an airtight container for up to two weeks.

Tip: before measuring out your golden syrup, rub a drop of oil over the spoon; the syrup will easily slide off.

What sweets are your favourite for decorating gingerbread?

Chewy chai cookies

There’s something wonderfully comforting about oatmeal cookies, especially ones with soft chewy centres. We regularly make variations of our chewy oaty biscuits, which Nicholas likes to both make and eat, but I wanted to try making some with the warm and lightly spiced flavour of my beloved vanilla chai tea.

While these are not the healthiest snack, I’ve reduced the sugar content quite a bit (by a third!) so you can feel less guilty eating them. If you prefer sweeter cookies you can also add a handful of raisins or sultanas to the cookie dough.

Oatmeal oaty biscuits

If you can’t get hold of vanilla chai teabags, look at my tip below the recipe for recreating the flavours with spices you probably already have in your cupboard.

I make these quite small (they’re about 5cm in diameter after cooking), so you can indulge with less guilt. The recipe is easily doubled though if you prefer to make bigger ones.

CHEWY CHAI COOKIES

Prep time: 10 mins
Cook time: 10-12 mins
Makes 12 small cookies

60g butter, chopped
1 tbsp honey or agave nectar
75g (1/2 cup) rolled oats
50g (1/2 cup) plain flour
50g (1/4 cup) soft brown sugar
2 vanilla chai tea bags (leaves only)

Preheat your oven to 160C and line an oven tray with baking paper.

Gently melt the butter and honey (or agave nectar) either in the microwave or in a small saucepan. Leave to cool.

Mix the oats, flour, sugar and tea leaves together in a medium-sized bowl.

Pour in the cooled melted butter and honey, and mix until combined.

Roll the mixture into small balls and place well apart on the prepared tray. Press down with the back of an oiled spoon to flatten them slightly.

Bake for 10-12 minutes until just starting to turn brown, flattening them again with the back of an oiled spoon after about 5 mins of cooking. (If you prefer crunchy cookies, cook them for a few minutes longer until turned golden brown.)

Leave the cookies to cool on the tray for 5 mins to firm up before transferring them to a wire rack to completely cool.

Variations:

  • Use a dairy-free margarine instead of the butter to make dairy-free cookies;
  • Add a handful of dried fruit such as raisins, chopped dried apricot, dried apple or dried strawberries;
  • Add chocolate chips to the mixture or drizzle the baked cookies with melted chocolate;
  • Add flaked almonds.

Tip: instead of using the vanilla chai tea leaves, make your own chai spice mix by combining 1 tsp ground cinnamon, 1/2 tsp ground ginger, 1/4 tsp ground allspice, a pinch of ground cloves and a pinch of freshly ground pepper. Also add 1/2 tsp vanilla essence to your cookie dough.

AlphaBakes Logo

I’m linking this recipe to the AlphaBakes monthly challenge (this month it’s the letter ‘C’) jointly hosted by Caroline from Caroline Makes and Ros from The More than Occasional Baker (and I’m quietly very proud of achieving a triple letter ‘C’ this time ;))

Carrot, spinach and cumin muffins

It’s National Baking Week here in the UK and many people across the UK are baking up a storm to raise money for the wonderful Great Ormond Street Hospital.

I thought we’d try another of Hugh Fearnley-Whittingstall’s savoury muffin recipes to start our week of baking, as we all loved his courgette and pine nut muffins. And his combination of carrot, spinach and cumin didn’t disappoint! Savoury muffins are such as great finger food for little hands and mouths, and you really can pack them full of wonderfully nutritious vegetables.

Hugh Fearnley-Whittingstall

Usually for me, savoury muffins just have to have some kind of cheese (is that just me?). Cheese makes pretty much everything taste better! Yet, amazingly, I didn’t miss the lack of cheese in these at all.

The only thing I’ve changed from Hugh’s original recipe is the amount of spinach. He uses 150g of spinach, while 100g was enough for me (and left me with spinach leaves to throw into other dishes for the rest of the week).

If it’s difficult finding the time to cook, try to toast the pumpkin seeds ahead of time, even the day before. If you don’t have pumpkin seeds (they add a fabulous extra texture to the muffins) you can use sunflower seeds or a mixture of the two (Hugh’s suggestion). You could also cook the onion mixture ahead of time.

The batter is quite a stiff mixture, but still produces lovely moist muffins which freeze wonderfully (great to have in the freezer to add to lunchboxes).

CARROT, SPINACH AND CUMIN MUFFINS

Prep time: 15 mins
Cook time: 18-20 mins
Makes 12
Freezable

80g unsalted butter, melted and cooled, plus extra 10g for frying
1 onion, finely diced
2 tsp ground cumin
100g spinach, tough stalks removed and very finely shredded
250g plain flour
2 tsp baking powder
1/2 tsp bicarbonate of soda
1 1/2 tsp salt
2 eggs
275g whole milk yoghurt
150g carrots, grated
40g pumpkin seeds, toasted

Heat the oven to 200C and line a muffin tray with paper cases.

Warm the 10g of butter in a large frying pan and sauté the onion with a pinch of salt until soft and translucent, about 10 minutes.

Add the cumin, stir for a minute, then add the spinach and stir until wilted and soft. Leave the mixture to cool.

In a large bowl, whisk together the flour, baking powder, bicarbonate of soda and salt.

In a jug, whisk the cooled melted butter, eggs and yoghurt.

Pour the wet ingredients over the flour and stir with a spatula until just combined. Fold in the cooled onions and spinach, the grated carrot and seeds.

Spoon into the prepared cases and bake for about 18-20 minutes, until a toothpick comes out clean.

Hugh Fearnley-Whittingstall

How are you celebrating Baking Week?

Spinach crepes

We pretty much always have fresh spinach on hand. It’s easy to throw in a handful to boost the nutritional content of a surprising number of meals. A few leaves get added to Nicholas’ breakfast banana milkshake and my morning protein shake, a few handfuls into dinner casseroles just at the end of cooking, and pasta sauces, scrambled egg and savoury muffins also often have some spinach.

If you want to wilt the spinach before adding it, don’t get out a frying pan. Fill up your kettle and turn it on, put the spinach leaves in a sieve and then pour over the just boiled water. Use a wooden spoon to press out as much excess water as you can and, when it’s cool enough to touch, squeeze out more with your hands. Easy and less washing up to do!

savoury crepes

Adding spinach to a crepe mixture works really well. You end up with amazingly green crepes (we call them ‘monster food’) without any bits of spinach your little one might be tempted to pull out. Fill them with your munchkin’s favourite filling and they should be a hit.

My recipe feeds 2 adults plus 1-2 toddlers, but is easily doubled so you can freeze some for another day (put baking paper between them before you freeze them to separate them more easily), or keep the leftover batter in the fridge to make more the next day.

Leftover crepes also work really well in lunchboxes. Spread with a soft cheese and some ham, roll up like a swiss roll and cut slices about 2cm thick.

SPINACH CREPES

Prep time: 10 mins
Cook time: 20 mins
Makes 6 crepes
Freezable (without filling)

50g fresh spinach
150ml milk
75g plain flour
1 egg
1 tsp butter, melted and slightly cooled
Fillings such as grated cheese, sliced ham, shredded cooked chicken, sliced tomatoes.

Preheat your oven to 120C.

Put the spinach and milk into a bowl or jug and use a stab blender to combine until the spinach has completely broken up (or use a small food processor).

Add the flour and egg and blend again. Finally add the melted butter.

Put a small frying pan over a medium-low heat and either coat with cooking spray or a little extra butter (wipe any excess butter away with kitchen towel).

Add a ladleful of batter and swirl the pan to evenly coat the base.

Cook for 1-2 minutes on the first side (the edges will start to curl up) then turn to cook the other side. Turn the temperature down to low and add your fillings. Cook for another minute before folding in half and then in quarters.

Put the cooked crepes into an ovenproof dish and put in the oven to keep warm as you make the rest.

AlphaBakes LogoI’m linking this recipe to the AlphaBakes monthly challenge (this month it’s the letter ‘C’) jointly hosted by Ros from The More than Occasional Baker and Caroline from Caroline Makes.

Leftover veggie pops

While the weather is getting colder and my summer tan is fading, I’m consoling myself with cooking shows. And thankfully I can watch two of my favourites at the moment (The Great British Bake Off and Australian Masterchef).

I’ve struggled to get back into the kitchen after our late summer holidays, and have had little inspiration to be creative, but watching Australian Masterchef’s kids’ week has ignited some enthusiasm. One challenge had the contestants inventing a child-friendly dish using either liver, brussel sprouts or anchovies which were tasted and judged by three children.

Thinking about what I would do if I was a contestant (don’t we all do that watching these kinds of shows?), I thought about dishes that usually go down well with kids and my three ideas were pizza, pasta and things on sticks, all of which then featured in the better dishes made.

The most creative for me was a meat and liver ‘lollipop’ which was dipped into satay sauce and then some crushed peanuts by the kids. They loved it and it was such a brilliant idea that it got me thinking about getting vegetables into something similar.

When I was clearing up after dinner and wondering what I could do the following day with some leftover vegetables, inspiration hit me! It’s one of those ideas which makes you wonder why you never thought of it before. Leftover veggie pops were born!

leftover vegetables

All of the other fussy-eater-parents out there, you have my complete and utmost sympathy. It’s a tough gig already without this extra stress. Thankfully, and very luckily for us, Nicholas’ fussiness for eating (especially vegetables) was a phase which we seem now to be through. Interestingly, I have made similar fried vegetable balls and patties in the past which weren’t eaten, but… I didn’t serve them on sticks. Why didn’t I think of putting vegetables on sticks before now?!?

Nicholas first encountered these in his lunchbox. When I picked him up and asked him how his lunch was, he very excitedly told me he’d eaten “cheesy lollipops! cheesy mummy!” and his favourite dinosaur-shaped sandwiches merely got a mention. Success!

You can use pretty much any leftover vegetables you want. So long as they’re already cooked, all you need to do is mash them and mix them with a few other ingredients you probably already have. If your munchkins tend to pick out the vegetables they don’t like (probably the green ones!), use a potato ricer or quickly blend the veggies in a food processor to make the mixture smooth and even in colour.

These are not the healthiest way to serve vegetables as they’re fried, but you could also bake them in the oven (turn them regularly so they brown evenly). Pop any remaining balls in the freezer for another fun vegetable side dish another day.

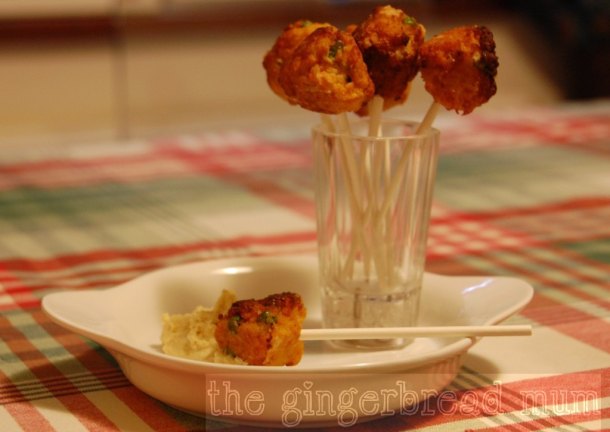
LEFTOVER VEGGIE POPS

Prep time: 10 mins
Cook time: 10 mins
Makes about 25 pops
Freezable

2 cups of leftover cooked vegetables (I used sweet potato, leeks and peas), mashed or blended
1/2 – 3/4 cup grated cheddar (depending on how cheesy you want them)
1/4 cup dried breadcrumbs
Salt and pepper (optional)
1 egg, beaten
Vegetable oil
Clean lollipop sticks or ice lolly sticks

In a medium-sized bowl, mix the mashed or blended vegetables, cheddar, breadcrumbs, and salt and pepper if using.

Add about half of the beaten egg and mix. Add more egg a little at a time until you have a mixture just wet enough that it sticks together to shape into balls (if the mixture becames too wet, add some more breadcrumbs a little at a time).

Shape the mixture into small balls (about the size of a walnut shell).

In a frying pan, pour enough oil to cover the bottom of the pan to the depth of about 1cm. Heat over a medium-high heat then fry the vegetable balls turning them over regularly so they evenly brown.

Drain the cooked vegetable balls on some kitchen towel and when cool enough to touch, place each on a lollipop stick.

Add to the fun by serving the pops with a dipping sauce such as houmous, tomato sauce or a satay sauce.

leftover vegetables
Letting your creative juices run wild, what other food or dishes do you think you little ones would love more if they were served on a stick?