While I’m waiting until it’s December before doing any Christmas food posts, I figured those of you who like doing Christmas-y crafts might want to get started. Every year I have a list of craft projects I intend to do, but my list tends to get more and more impressive while I manage to make very little! And Pinterest just makes this worse. But, I was spurred on to make these decorations from Martha Stewart, thinking that Nicholas would have fun helping me. And he did.

Making them is just like making a cookie dough and cutting out your shapes, but this dough isn’t edible. Thankfully Nicholas didn’t try to put too many pieces in his mouth, probably because he was having so much fun sprinkling cinnamon everywhere (and I do mean everywhere). He kept calling the shapes we pressed out ‘biscuits’ and almost every time he goes into the living room where I’ve strung some of them above our fireplace, he points and says either ‘yum’ or ‘biscuit’. Well they do look like yummy gingerbread and smell divine.
When you’re rolling out the dough, be generous with extra sprinklings of cinnamon to avoid the dough sticking to your work bench or rolling pin. Use it just as you’d use extra flour when rolling out cookie dough.
You can dry your decorations in a slow oven or let them dry on their own. I let them dry naturally overnight (let them have at least 24 hours). The thicker shapes dried better without having to use anything to weigh them down to keep them flat, while the ones we rolled out thinner curled up easily. Rolling out your dough to about 5mm thick seems to work well.
While Martha Stewart made intricately decorated birds using cardboard templates and glitter, we stuck to a few Christmas-shaped cookie cutters and I decorated them simply (in a way I think kids would enjoy doing themselves without too much mess). I tried using a silver pen, drawing little stars (the bottom left star in the photo above), but preferred using 3D fabric paint as it was thicker and therefore easier to apply to the leather-like surface. You could also use glitter pens, or lightly paint the surface with glue and dip in glitter.
I’m sure you can think of other ways of using these decorations rather than just hanging them from your Christmas tree or stringing them into garlands. Why not turn them into gift tags or make place settings?
The original recipe uses applesauce to make the dough pliable. I couldn’t be bothered defrosting a bag of homemade applesauce, so I used a tub of apple and strawberry baby puree I had in the cupboard. It did the job.
Who knows whether these decorations will make it to next Christmas, but then it’s such a nice activity I think it could become a tradition making more every year to decorate the house.

CINNAMON CHRISTMAS DECORATIONS
Makes about 16 cookie-sized decorations
1 cup (100g) ground cinnamon, plus extra for rolling out dough
1/4 cup applesauce or apple puree
1/2 cup craft glue
In a medium-sized bowl, mix the cinnamon and applesauce with a rubber spatula until combined.
Add the glue and stir until you can bring the dough together into a ball. Knead it a little and then leave to rest for an hour.
Sprinkle your work surface with the extra cinnamon and dust your rolling pin. Cut off about a third of the dough and roll it flat until it’s about 5mm thick. If at any time the dough becomes too dry, spray with a little water.
Cut out your shapes with cookie cutters or cut around templates. Repeat with the remaining dough.
Use a straw to poke a hole in each shape for hanging (or use a skewer if your shapes are small).
Dry your ornaments on a wire rack lined with paper towel for approximately 24 hours (turning them every 6 hours or so if you can, to keep them flat). Otherwise you can dry them in the oven on a baking paper-lined tray for 2 hours at 95C turning them halfway through.
Once completely dry, decorate as you wish or leave them plain.
After Christmas, store them in a cool dry space, wrapped individually in tissue paper.


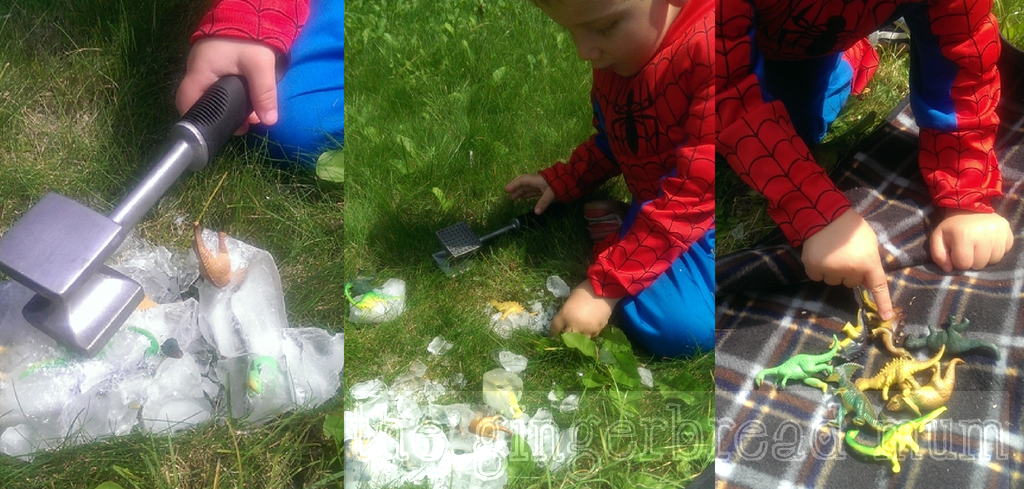
 When I did buy some small dinosaurs, I put some in an empty ice cream container, covered them in water and froze them. The next day we excavated them. I’m not sure what Nicholas was more excited about – discovering dinosaurs in the ice or getting to use the heavy meat tenderiser to bash them out!