RSS Feed

Category Archives: family

Coconut and lime macaroons

While Easter is over, although the tempting chocolate eggs linger, I wanted to share one last Easter-inspired recipe. The great thing is you don’t need to wait until next Easter to make them. Shape them into circles or other shapes, colour them or not, and they’re a great dairy-free sweet morsel.

coconut and lime macaroon eggs

This recipe (apart from the food colouring) is an unchanged Jill Dupleix recipe and, following her food philosophy, they are a wonderfully light treat. The non-traditional lime zest and juice add a fresh zing, and contrast perfectly with the chewy coconut interior, making it easier to eat another one, and another one, and another one!

I wanted little bite-sized macaroons so I used a very small round cookie cutter approximately 4cm in diameter. I then shaped the circles into egg shapes by gently pinching the top. Jill uses the rim of a small liqueur glass to make slightly bigger macaroons. Because mine were smaller than the original recipe, they cooked quicker. Do watch them closely as they can colour very quickly at the end (as you can see in my photo!).

Nicholas had great fun helping me squish and squeeze the ingredients together with our hands. He also enjoyed cutting out the circles, but because of the sticky consistency of the mixture he needed help to get them on the baking tray.

making coconut and lime macaroons

Make them plain like the original recipe or add some food colouring for fun. We also made multi-coloured macaroons by pressing stripes of different coloured mixture together. With so few ingredients they’re perfect for your munchkin’s next cooking activity.

COCONUT AND LIME MACAROONS

Prep time: 10-15 mins
Cook time: 8-12 mins
Makes 30 bite-sized macaroons

2 egg whites
100g caster sugar
160g desiccated coconut
1 tsp grated lime (about 1/2 a lime)
1 tbsp lime juice (about 1/2 a lime)
food colouring of your choice (optional)

Preheat the oven to 180C and line a baking tray with baking paper.

Put the egg whites, sugar, coconut, lime zest and juice in a bowl, and use your hands to mix and squeeze until they lightly come together.

If using food colouring, divide you mixture into smaller bowls and add a drop or two of your desired colouring. Mix until evenly coloured.

On a piece of baking paper, press the mixture into a flat shape (about 1cm high) using wet hands.

Use a small round cookie cutter (approx. 4cm in diameter) to cut out small rounds, and place on your prepared baking tray.

Using wet hands, gently pinch the top of each circle to create oval shapes.

Bake for 8-12 minutes in the centre of the oven until just starting to colour.

Cool the macaroons on a wire rack (move them carefully as they’ll still be quite soft while they’re still warm), and store in an airtight jar.

Happy belated Easter from my own little Easter bunny!

Hot Cross Buns

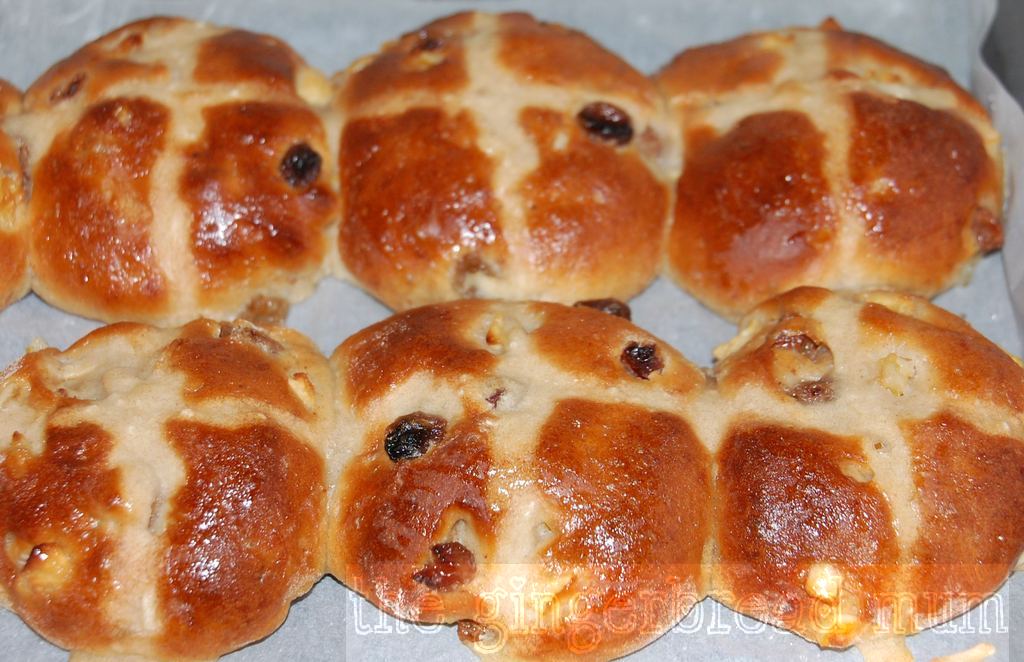
Staying at home this year for Easter (yay!), I wanted to cook some traditional Easter dishes. And apart from Easter eggs, something that cries ‘Easter!’ for me are hot cross buns.

hot cross buns

I came across Paul Hollywood’s recipe online and then saw him make them on The Great British Bake Off’s Easter Masterclass (still available to watch on BBC’s iPlayer for those of you in the UK). All the online positive comments easily swayed me, as well as the addition of a couple of different ingredients which I was curious about.

By the way, did you know the buns and their distinctive crosses come from pagan traditions rather than Christian? The word ‘Easter’ comes from the goddess Eostre who was worshipped by the Saxons. To celebrate the arrival of spring, they made her bun offerings, marked with crosses to represent the four seasons. Enter the Christians, and they realised it was better to reinterpret the pagan Easter festivities rather than try to eliminate them. Thus the buns’ crosses came to symbolise Jesus’ crucifixion.

In the end I was very happy with my first attempt at baking hot cross buns. I used to bake bread quite a bit, but my last few efforts didn’t turn out that well so I stopped making it and became a bit afraid of any recipe involving yeast. Now was the perfect time to conquer my fear!

You need to allow a lot of time for proving (you leave the dough three times, each time for an hour, to rise), so making hot cross buns is for when you’re home all day or afternoon, and probably isn’t a great recipe to try with kids. I also made the mistake of not reading the ingredients list carefully enough. Milk: check; butter: check; strong bread flour: add to the shopping list… yeast: check… but as I started to make them I realised Paul Hollywood specifies fast-action or easy-blend yeast, which I didn’t have. What the heck, I thought, let’s see if the yeast I have works without dissolving it in liquid first. I followed the recipe and let the dough stand for its first hour of rising, but it didn’t rise. Ok, of course, Paul Hollywood knows what he’s talking about. Take two!

To activate my normal dried yeast, I took 3 tablespoons of the milk before I heated it and put it aside. I also took 5g from the 75g of caster sugar and put it in the bowl with the yeast. Once the rest of the milk was heated, I added the cold milk and enough hot milk to the yeast and sugar to dissolve them. I left the yeast mixture for 15 minutes to do its stuff and was thankful it was frothy when I came back. I then added the frothy yeast to the dry ingredients when I added the milk and continued as the recipe states. This time my dough rose!

The original recipe has an apricot jam glaze, but many of the people reviewing it said they preferred a simple sugar glaze. I went with the sugar glaze.

Another common comment by people who’ve made Paul’s hot cross buns is that there’s a lack of spice. When I think of hot cross buns I can almost smell the warmth of spices like cinnamon, nutmeg and cloves. I followed Paul’s recipe and only included 1 teaspoon of cinnamon. While hubby pointed out that this amount of cinnamon balances well with the other flavours, it doesn’t give you the heady aroma of spices. Next time I’d add some more cinnamon, plus some nutmeg and a little cloves.

Paul’s different ingredients of orange zest and chopped apple really do add to the flavour without actually being obviously noticeable. I was surprised not to come across pieces of apple (I chopped them into 1cm squares more or less) which probably was a good thing. The amount of candied peel is also on the safe side. Hubby is a huge fan so could have had more, while I don’t like it and the amount was fine for me.

I’m always afraid of dried fruit like sultanas and raisins drying out when they’re cooking, so I soaked the sultanas in hot water for 30 mins before adding them. They did come out lovely and plump.

Anyway, I’ve made you read far too much. Get baking your one a penny, two a penny…

HOT CROSS BUNS

Prep time: 30 mins (plus 3 x 1 hour of proving)
Cook time: 12-15 mins
Makes 16 buns
Freezable

300ml full-fat milk
50g butter
500g strong bread flour
1 tsp salt
75g caster sugar
7g sachet fast-action or easy-blend yeast
1 egg, beaten
75g sultanas
50g mixed peel
zest 1 orange
1 apple, peeled, cored and finely chopped
1 tsp ground cinnamon

For the cross
75g plain flour
water

For the glaze
25g caster sugar
25ml water

In a small saucepan, bring the milk to the boil. Remove from the heat and add the butter. Leave to cool until it reaches a temperature you can put your hand into.

Put the flour, salt, sugar and yeast into a bowl (keeping the salt away from the yeast). Make a well in the centre. Pour in the warm milk and butter mixture, then add the egg. Using a wooden spoon, mix well.

Use your hands to bring the dough together then tip onto a lightly floured surface. Knead for about 5 minutes until smooth and elastic (Paul suggests holding the dough with one hand and stretching it with the heel of the other hand, then folding it back on itself).

Put the dough in a clean and lightly oiled bowl. Cover with oiled cling film (to stop the dough drying out) and leave to rise in a warm place for 1 hour or until doubled in size.

Keeping the dough in the bowl, add the sultanas, mixed peel, orange zest, apple and cinnamon. Knead into the dough, making sure everything is well distributed (this isn’t as easy as it sounds!). Cover and leave to rise for another hour or until doubled in size.

Divide the dough into 16 even pieces (Paul actually says 15 pieces, but I have an issue with odd number when baking, and to weigh each piece so they cook evenly). Roll each piece into a smooth ball on a lightly floured work surface (Paul suggests cupping your hand over the ball and using a circular motion, first slow then fast, to create an even ball).

Arrange the buns on two baking trays lined with baking paper, leaving some space for the dough to expand. Cover (but don’t wrap) with more oiled cling film, or a clean tea towel, and let them prove for another hour.

Heat your oven to 220C (200C fan).

Mix the flour for the cross with about 5 tbsp water to make a paste, adding the water 1 tbsp at a time to achieve a thick paste. Spoon into a piping bag with a small nozzle. Pipe a line along each row of buns, then repeat in the other direction to create crosses (Paul suggests starting piping on the baking tray, moving over the buns and finishing on the baking tray so your crosses go all the way across your buns).

Bake for 12-15 minutes on the middle shelf of the oven, until golden brown.

Gently heat the sugar and water for the glaze either in a small saucepan or in the microwave.  While the buns are still warm, brush over the sugar syrup over the top of the buns and leave to cool.

Variations:

  • add some more spice such as nutmeg and cloves (even ginger) for a more traditional spiced bun
  • glaze the warm buns with warmed and sieved apricot jam (Paul’s suggestion), or honey or golden syrup
  • add some different dried fruit such as cranberries, cherries or dates
  • add 100g of broken up chocolate for more decadent buns

How do you eat your hot cross buns? Toasted? Anything on top?

Easter Food Inspiration

Easter is almost here. Let your imagination run wild and make something too cute for your munchkins to eat. Need some inspiration? Here are some of my favourites.

Easter Bunny Rolls

Easter Bunny Rolls from Taste of Home
How could you not smile if these little edible bunnies were on your table?

Easter egg popsicles

Easter Egg Popsicles by Kailo Chic
Kara’s use of plastic Easter eggs is brilliant. She uses fruit juice, but you could also
try flavoured yogurt, pureed fruit, lemonade, or pureed banana and Nutella.

Easter Egg Lunch

Easter Egg Lunch by Gluesticks
You don’t need to shape your food into complicated bunnies
or chicks, just put bite-sized morsels into plastic Easter eggs.
I love the simplicity of Brandy’s idea. She’s also gotten her kids
to go on an egg hunt to find their lunch!

Little Chick SandwichLittle Chicken Lunch by Little Bento Blog
I love the simplicity of Yvette’s little chicken with
its ham crest, and carrot legs and beak.
Check out her blog for other fabulous cute ideas for lunches.

Easter Bunny 1Easter Bunny Lunch by Creative Food Blog
I’m an avid reader of Michelle’s blog and love her creativity
(check out the Angry Birds party she’s just done for her daughter).
Her bunny with its banana ears is just the cutest thing on a plate!

baby-chicks-marshmallows1

Baby Chick Marshmallow Treats by Living Locurto
Amy’s chicks are so cute and yet so easy to make, and a nice sweet Easter treat.
All you need are marshmallows, jellybeans, some icing and an edible food pen.
(Leave out the toothpick legs for little mouths).

Marzipan-filled Easter Pastries

Marzipan-filled Easter Pastries by Sweetapolita

Rosie’s Maltese pastries are stunning. Even if you don’t have the time to make
them, you could use them as inspiration for your own decorated bunny cookies.
While Rosie used piped stiff icing for her fluffy bunny tails, I love the idea of
using mini meringues (mini easter eggs would be cute too).

Broccoli, asparagus and pea soup

Until I started thinking about St Patrick’s Day, and what healthy green recipe I could come up with for you, I didn’t realise that most of the soups I’ve posted here are green! So I thought I’d make a super green soup, the greenest of green soups for this St Paddy’s Day.

broccoli, asparagus and pea soup

BROCCOLI, ASPARAGUS AND PEA SOUP

Prep time: 15 mins
Cook time: 20 mins
Makes 6 adult servings
Freezable

1 tbsp olive oil (or butter)
1 onion, diced
2 sticks celery, roughly chopped
300g broccoli, stalks and heads roughly chopped
300g asparagus, roughly chopped
1 cup frozen peas
1 litre hot vegetable or chicken stock
1 tbsp fresh thyme leaves
Salt and pepper

Heat the olive oil in a large pot over a medium heat. Add the onions and celery, and sauté for 5 minutes without letting the vegetables brown (turn down the heat if they do start to brown).

Add the broccoli stalks and about 750ml of stock to the pot. Bring to the boil then reduce the heat to low, cover and simmer for about 10 minutes.

Add the broccoli heads, asparagus, peas and thyme, cover and cook for another 5 minutes until the broccoli stalks and asparagus are tender.

Take off the heat and purée until smooth. Check if you need to add any seasoning.

Variations:

  • For older palettes, add a pinch of warming cayenne pepper as you sauté the onion and celery.

Are you eating (or drinking) anything special for St Patrick’s Day tomorrow?

Sweet potato crisps

sweet potato crisps

Who doesn’t like crisps? If your hand’s up, I don’t believe you!

Hubby is a big fan of vegetable crisps. So when I came across Yelena’s Orange Sweet Potato Crisps with Thyme (on her Melangery food blog) I thought both hubby and Nicholas would like them. Take a look at Yelena’s gorgeous photos and try not to drool.

The additional flavours of orange (zest) and thyme work delightfully with the sweet potato (I’m thinking of adding them when I next make sweet potato mash). But if you wanted plainer or easier crisps, you could leave them out.

If you don’t have a mandoline slicer, just make sure you slice the sweet potato as thinly as you can. I always struggle with my mandoline slicer and never get the lovely quick sliding action I see others use on cooking shows. If anyone has any tips for using them, please share!

You need to eat these fairly quickly after cooking them otherwise they’ll start losing their lovely crispiness. Although, I’m sure sticking them back into the oven for a few minutes would crisp them up again.

sweet potato crisps

SWEET POTATO CRISPS

Prep time: 10-15 mins
Cook time: 40 mins
Makes 2 servings

1 medium sweet potato, scrubbed and sliced as thinly as possible into rounds
2 tbsp olive oil
1 tsp orange zest
1 tsp thyme
salt and pepper

Preheat your oven to 160C. Line two oven trays with baking paper.

Mix the olive oil and orange zest together in a small bowl.

Using a pastry brush, brush the trays with about half of the orange oil mixture.

Lay the sweet potato slices on the tray in a single layer and brush with the remaining orange oil.

Sprinkle over the thyme, and salt and pepper.

Bake one tray at a time for about 20 mins until the edges are starting to curl up, and the centre is dry to the touch and golden brown (I let mine cook a bit too long).

Put the tray on a wire rack for the crisps to cool. After a few minutes they’ll become crisp.

Repeat with your second tray of sweet potato slices.

Eat immediately!

Broccoli soup

Nicholas’ second birthday is quickly approaching (where did that last year go? Hang on, where did those two years go?), hence most of my time in the kitchen is party food planning and preparation. I’m trying very hard to reign my wild ideas in to something more easily achieveable!

But I am continuing my soup crusade and I’m loving the fact that Nicholas is often asking for soup, especially at dinner time. This really has been a successful way to get more veg into him.

Nicholas eating broccoli - look at those chubby fingers!

Initially Nicholas loved broccoli, and happily munched it as one of his first finger foods. That didn’t last long. The only way he eats it now is if he can’t pick it out of whatever new thing I’ve tried to ‘hide’ it in. He can’t get enough of smooth broccoli soup!

You can make a simple broccoli soup with broccoli, onion and potato, but when I came across a different take on the standard version which has white beans and ginger I knew I had to try it.  Melissa and Jasmine Hemsley’s broccoli, ginger and white bean soup uses the whole head of broccoli, fresh ginger for a healthy zing and white beans to boost the nutritional value even more. The two sisters are the founders of Hemsley & Hemsley, promoting healthy food.

I decreased the zing in the soup (for younger taste buds) by using ground ginger instead of fresh and omitting the lime juice,  but I did leave in the pinch of cayenne pepper and all 5 cloves of garlic (use your knowledge of your family’s tastebuds to decide, but I’d err on the side of caution initially with little ones). I also reduced the salt by leaving out the Tamari soy sauce. Next time I’ll try using fresh ginger, but a smaller piece than the original recipe. I love the extra thickness you get using some white beans (I think they’ll often be added to my soups from now on!).

This makes a large quantity of soup; perfect for freezing the leftovers for another week.

broccoli soup

BROCCOLI SOUP

Prep time: 15 mins
Cook time: 18-20 mins
Makes 6 adult servings
Freezable

600g broccoli
2 onions, roughly chopped
5 cloves of garlic, roughly chopped
1 tbsp vegetable oil (the original recipe uses coconut oil)
1 tsp ground ginger
a small pinch of cayenne peper
1 litre of good quality vegetable or water
1 400g can of white beans (I used butter beans but you could use cannellini or haricot beans), rinsed and drained
salt and pepper

In a large pot, gently fry the onion, garlic, ground ginger and cayenne pepper in the oil over a medium-low heat for 5 minutes.

Remove the heads from the broccoli and roughly chop, then roughly chop the stems.

Add the broccoli stalks and about 750ml of the stock to the pot. Bring to the boil then reduce the heat to low, cover and simmer for 8-10 minutes.

Add the broccoli heads and white beans, cover and cook for another 5 mins until the broccoli stalks are tender.

Take off the heat and puree until smooth. Check if you need to add any seasoning.

Variations:

  • For older eaters, serve with a sprinking of toasted pine nuts or seeds.
  • Serve with a squeeze of lemon or lime juice.
  • Take out some of the broccoli heads before pureeing, then add for a chunkier soup.
  • Serve with a small piece of soft spreadable cheese swirled through.

The fluffiest pancakes

Today is pancake day (Shrove Tuesday). It marks the last day before Lent, which traditionally is a period of abstinence, and what better excuse for your family to start the day with something more indulgent than your usual cereal and toast?

Many people like their pancakes thin, similar to crepes. I’ll happily eat those but usually filled with a savoury filling. For me, sweet pancakes have to be thick and fluffy, stacked high and topped with fruit.

My lovely niece Emily made these for us for Christmas breakfast. It’s a fantastic recipe from Exclusively Food that doesn’t need an extra standing time, and produces pancakes that aren’t too sweet and are perfectly fluffy (even the first one you make).

I’ve made no changes to the original recipe – they’re absolute perfection! However, they do suggest using the back of a spoon to spread out the batter, just as you pour it into the pan, to form an 11cm diameter circle. You could do this if you prefer thinner pancakes; I just let the batter spread on its own to keep them thick (and they spread to the same diameter anyway).

The fluffiest pancakes

THE FLUFFIEST PANCAKES

Prep time: 15 mins
Cook time: 20-25 mins
Makes about 12 medium pancakes

375ml (1 1/2 cups) full cream milk
2 tsp (10ml) lemon juice
35g (2 tbsp) sugar
225g (1 1/2 cups) self-raising flour
1/4 tsp bicarbonate of soda
1 large egg
30g (1 1/2 tbsp) butter, melted
Extra butter, for greasing pan

Mix the milk, lemon juice and sugar in a medium bowl, then set aside for five minutes. (It might develop a slightly curdled look during this time.)

Sift the flour and bicarbonate of soda together into a large bowl.

Break the egg into the milk mixture and add the melted butter. Whisk until the egg has combined with the milk (don’t worry it the butter just floats on the surface).

Add the milk mixture to the flour mixture and whisk quickly until almost smooth (the batter should still have a few small lumps). Don’t overmix the batter as this can make the pancakes tough. Leave the batter to rest while the pan is preheating (at least two minutes).

Heat a large non-stick frying pan over a medium heat. Melt a little butter in the pan to lightly grease it.

For each pancake, scoop 1/4 cup of the batter into the pan. Cook only two or three at a time, otherwise turning the pancakes will be difficult.

Cook the first side until small bubbles appear and burst on the surface (about 1-2 minutes).

Turn over with a spatula and cook until the second side is lightly browned and the pancakes are cooked through (another 1-2 minutes).

Cover with a clean tea towel to keep warm while you finish making the others. Add a little more butter to grease the pan each time and keep checking the temperature of the pan as it will probably need to be reduced as the pan heats up with use.