RSS Feed

Tag Archives: recipe

Banana and nutella muffins

Hannah at Mums’ Days has made a fabulous list of recipes to use up browning bananas. Her 10 ways to use up old bananas includes banana milkshakes and smoothies, banana gelato, banana pancakes, banana bread and also my sugar-free flapjacks (which is without a doubt the most popular recipe on my blog).

Yesterday I needed a ‘pick-me-up’ and seeing the bananas in my fruit bowl that looked like they were very close to walking to the bin on their own, I thought of Hannah’s list, especially The Londoner’s Nutella swirl banana muffins. Perfect!

Banana and nutella muffins

Even though I wanted to eat something indulgent I couldn’t help myself from trying to make Rosie’s original recipe slightly healthier. So I reduced the sugar by a third and substituted some of the white self-raising flour with wholemeal. For muffins, the slightly heavier and denser cousins of cupcakes, you can definitely get away with adding some healthier wholemeal flour.

My taste-testers made no comment about the lack of sugar (and hubby ALWAYS comments if something I make isn’t sweet enough in his opinion). The fact that very ripe bananas are super sweet, plus the addition of Nutella makes it very easy to reduce the sugar content significantly without losing the necessary sweetness needed for it still to be a sweet treat.

I do love Nutella, in particular for how little you can add of it to make something seem much more indulgent than it is. I like adding it to porridge as only half a teaspoon makes the porridge taste wonderfully chocolatey and incredibly indulgent.

When I showed the muffins going into the oven yesterday on Instagram, one of my lovely IG friends asked if I’d tried Lindt ball muffins. I’d forgotten seeing them and was very glad I had! But if you need a more indulgent muffin, why not try popping a Lindt ball into the centre rather than the Nutella; I’m sure they would be divine.

BANANA AND NUTELLA MUFFINS

Prep time: 15 mins
Cook time: 20-25 mins
Makes 12 muffins

115g unsalted butter
80g wholemeal self-raising flour
150g white self-raising flour
100g caster sugar
1/2 tsp salt
2 eggs, lightly beaten
3 very ripe bananas, peeled and mashed
1 tsp vanilla extract
4 tbsp Nutella, at room temperature

Gently melt the butter (I prefer to use the microwave) and leave to cool.

Heat the oven to 180C and lightly grease your muffin tins (or line with paper cases).

In a medium-sized mixing bowl, combine the wholemeal and white flours, the sugar and salt.

In a jug (or smaller mixing bowl), whisk together the melted butter, beaten eggs, mashed bananas and vanilla extract.

Pour the wet mixture into the dry ingredients and mix until just combined (mixing too much can make your muffins dense and chewy).

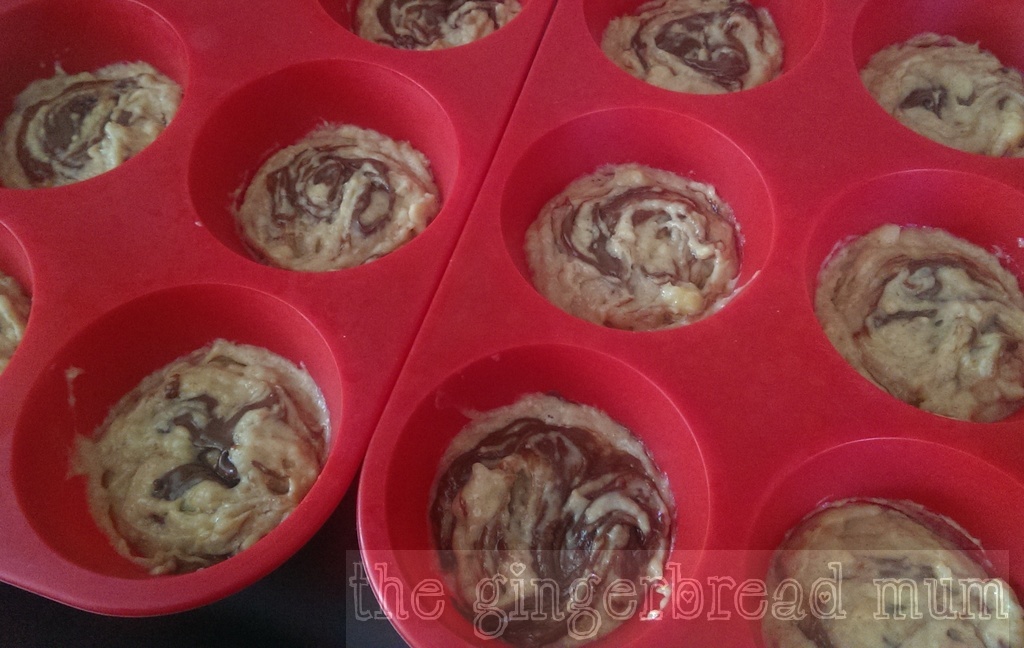
Divide the mixture evenly between the muffin tin holes (they’ll be about half to three-quarters full depending on the size of your tin). Add a small dollop of Nutella on top of each muffin and use a skewer (or knife) to swirl it through the muffin (not too much or you won’t see any swirls).
banana and Nutella muffins

Bake for 20-25 mins until golden and cooked through when tested with a skewer.

Variations:

  • instead of Nutella, place a piece of chocolate (or Lindt ball!) in the centre of each muffin before baking to make oozing chocolate banana muffins
  • add 1 tsp of ground cinnamon to the mashed banana
  • make banana and Nutella bread/cake by cooking the mixture in a loaf or cake tin

Tip: if your Nutella is still rather hard at room temperature, either place the jar into a sink of hot water or pop the jar (without its lid) in the microwave and zap at a low temperature for intervals of 10 seconds each until it’s slightly runny.

Beetroot and yogurt risotto

Beetroot is a vegetable I’ve only grown to love cooking with recently, most probably as I’ve previously written, my experience of it growing up was ready-cooked, sliced and in tins.

When it’s in season, beetroot features a lot in our weekly delivered fruit and vegetable box, and that’s encouraged me to try using it in different ways. I’ve blogged my most successful recipes to date: beetroot, feta and thyme muffins, pink (beetroot) pancakes and beetroot and yogurt dip. The dip is what got me thinking about making a beetroot risotto.

beetroot and yogurt risotto

Cook your beetroot in your preferred way (or buy it precooked to cook down on preparation time). I like wrapping them in one piece of foil and roasting them in the oven; there’s no need to trim or chop them. Once they’ve cooled, it’s easy to remove the skin. You can also cook them in the microwave.

Surprisingly, this risotto doesn’t taste overly of earthy beetroot and the yogurt gives it a lovely (healthier) richness and creaminess without adding the usual extra butter and parmesan at the end. Kids (and adults) will love the colour and Nicholas happily ate it. I used red wine to add to the colour and liked the extra depth of flavour it gave, but white wine would work just as well.

BEETROOT AND YOGURT RISOTTO

Prep time: 10 mins
Cook time: 20-25 mins
Serves 4 adults

400g cooked and peeled beetroot
1 tbsp olive oil
15g butter
1 onion, finely diced
350g risotto rice (I used Carnaroli)
250ml red wine
1 litre hot vegetable (or chicken) stock
150g Greek yogurt

Roughly chop the beetroot, put the pieces in a small food processor and blend until smooth.

Heat the oil and butter in a medium-sized pot over a medium-low heat. Add the onion and gently fry until softened.

Add the rice and quickly stir it so all the grains are coated. Add the wine and stir until it’s absorbed.

Start adding the stock a ladle at a time, letting it absorb then adding more. Keep doing this until the rice is ready (cooked but still with a little bite, about 15-20 minutes, and still moist). Remove from the heat.

Gently stir through the beetroot then the yogurt. Check for seasoning.

Tip: keep a small piece of beetroot aside and finely dice it to sprinkle over the top before serving.

What are you favourite ways of cooking with beetroot?

Yogurt Week: Beetroot and Yogurt Dip

This is a super easy, super quick and healthy dip, celebrating the versatility of yogurt.

My often fussy little eater kept wanting to taste this as we made it. The wonderfully vibrant colour appeals to little eyes, just be careful of beetroot stains! If serving this to a little eater, give them a variety of foods in different colours to dip in. You can also use it as a spread in sandwiches or wraps.

You still have plenty of time to celebrate Yogurt Week as well as enter the exciting Food Stylist competition (details in my last post). Did you know there is enough plain yogurt sold in the UK every year to make at least 616 million kormas?!

Yogurt Week

BEETROOT AND YOGURT DIP

Prep time: 5-10 mins
Cook time: 0 minutes!
Makes 4 servings

250g cooked beetroot, peeled and chopped into chunks
70g Greek yogurt
A pinch of cumin
Salt and pepper to taste

Put everything into a mini food processor and blitz until smooth. Taste and add more seasoning and cumin if needed.

Other uses:

  • use as a pasta sauce by stirring through hot cooked pasta
  • serve over rice
  • use as a crepe filling

Yogurt Week 2014Disclosure: I was compensated by The Yogurt Council to promote Yogurt Week.

Yogurt Week: Italian-inspired yogurt cake

Today is the first day of Yogurt Week, the UK’s first celebration of that wonderfully versatile dairy product and everything you can make with it.

Yogurt Week 2014What can’t you do with yogurt? Eat it on its own or add it to both sweet or savoury dishes, it’s a great way to add some creamy lusciousness without adding too many calories. It’s also a perfect first food for weaning babies.

With its power-boosting protein and bone-building calcium as well as a load of vitamins, it’s no wonder that in the UK we spent over £1.2 billion on yogurt in the last year (that’s £38 every second of every day!).

To celebrate yogurt, The Yogurt Council is running a Food Stylist Competition for those of you in the UK, with a £1,000 prize package up for grabs. All you need to do is create and style your own recipe using yogurt. The competition runs until Monday 9 June 2014 and more details can be found here.

Discover more about yogurt, and lots of yummy recipes using it, on the Yogurt Council’s website and follow @loveyogurtuk on Facebook, Twitter and Instagram.

Yogurt Week

Yogurt Week has been the perfect excuse for me to experiment with making something I often ate while living in Italy and have been wanting to try to make for a while.

‘Plumcake allo yogurt’ is eaten for breakfast and also as a snack for little ones. I have no idea why it’s called ‘plumcake’, especially when it has no plums (or anything resembling plums) in it! Aside from the misuse of English, this Italian yogurt cake is lovely and light, and yummy both for breakfast or afternoon tea. If you make it with low or no fat yogurt, you can have absolutely no guilt eating it for breakfast (remind yourself of the protein and calcium you’re treating your body to).

It’s an amazingly quick and easy cake to make, it’s really just beating the ingredients together, and doesn’t leave you with many dirty things to wash. It also freezes very well.

In making my Italian-inspired cake, I’ve only used ingredients that are common here in the UK. I also added some lemon zest as I like the tangy freshness it gives to the cake. (When brutally honest Italian hubby tried it, he quickly pointed out that plumcake doesn’t have lemon!) It’s just as yummy with or without the lemon; why not try both versions and tell me your favourite.

ITALIAN-INSPIRED YOGURT CAKE

Prep time: 15 mins
Cook time: 40-45 mins
Makes 1 loaf
Freezable

250g Greek yogurt
100ml light-flavoured vegetable oil (I use rapeseed oil)
zest of 1 lemon (optional)
3 eggs
140g caster sugar
200g self-raising flour
1 tsp baking powder
Pinch of salt

Preheat the oven to 175C. Line a loaf tin with baking paper.

Put the yogurt, oil and lemon zest (if using) into a medium-sized mixing bowl.

Beat the eggs until they’re light and fluffy (a hand whisk is fine), then beat them into the yogurt mixture.

Add the sugar, flour, baking powder and salt, and lightly beat until combined.

Pour the mixture into your prepared loaf tin and bake for 40-45 minutes until a skewer comes out clean.

Tip: if the top of your cake is browning too much in the oven but it’s not cooked, cover the top with a piece of aluminium foil to protect it.

By the way, can you guess what the most popular yogurt flavour is in the UK?

Disclosure: I was compensated by The Yogurt Council to develop a recipe using yogurt and promote Yogurt Week.


Sugar-free goji berry pancakes

nu3, the European nutrition experts, have just launched in the UK. Their online store has a huge range of products, including products that are exclusive to them, all to help us lead healthier lives. You can also get advice from their team of health specialists.

The company started only 5 years ago in Germany and have very quickly grown. Now we can also enjoy their huge range of health products.

As part of their UK launch, nu3 challenged me to come up with a recipe using their goji berries. Goji berries, also known as wolfberries, grow in China and are used in traditional Chinese medicine. They’re considered a superfood by many because they’re high in nutrients and antioxidents.

nu3 not only sell the dried berries, but also goji juice, goji capsules and chocolate covered goji berries. You can eat the dried goji berries simply as they are or easily pop them into smoothies or muesli and also even scatter them over salad. I experimented with adding them to cooking and I came up with some yummy pancakes.

nu3My regular readers will know I’m a big fan of fluffy pancakes so I used self-raising flour to make these pancakes lovely and light. To complement the healthy goji berries I used mainly wholemeal self-raising flour, and sweetened them with honey and very ripe banana rather than sugar (the riper the banana the better as it will be sweeter).

I felt very healthy eating them and figured I was allowed an extra drizzle of golden syrup over the top because of all the healthy ingredients inside! And Nicholas loved them too.

SUGAR-FREE GOJI BERRY PANCAKES

Prep time: 5-10 mins (plus overnight soaking time for the goji berries)
Cook time: 10-15 mins
Makes about 10 pancakes
Freezable

50g goji berries, covered in water and soaked overnight
1 1/2 cups self-raising flour (I used 1 cup of wholemeal and 1/2 cup of white self-raising flour)
1/4 tsp bicarbonate of soda
1/2 tsp ground cinnamon
1 tbsp honey
1 egg, beaten
1 very ripe banana, mashed
1 cup milk
Small piece of butter, melted, to grease the pan

Sift the flour, bicarbonate of soda and cinnamon into a medium- sized bowl.

Add the honey, egg and mashed banana then gradually pour in the milk mixing until you have a fairly thick batter (you might not need to use all the milk).

Drain the goji berries and gently mix them through the batter.

Heat a large frying pan over a medium heat and brush with melted butter. Use a tablespoon to drop spoonfuls of mixture into the pan. Cook in batches, turning when bubbles appear on the surface (1-2 mins). Cook the other side until golden brown (about 1 min). Lift out and cover with a clean tea towel to keep warm.

Variations:

  • Use nutmeg or ginger instead of cinnamon
  • Add vanilla essence for more sweetness

Tip: Wipe your pan clean with a piece of paper towel after each batch and then brush with some more melted butter.

Sugar-free peanut and date bites

While I’m not a vegan (and never could be), I like following people who are on Instagram for healthy food inspiration, especially trying to come up with different healthier snacks for Nicholas. One of my favourite vegan Instagrammers is the lovely Two Minute Vegan (@twominutevegan).

A few weeks back she came up with a great idea for a two-ingredient healthy snack bar using just dates and peanuts. I just had to try it!

veganBlending up the dates into a sticky purée produces a wonderfully sweet caramel-like flavour in the finished bites and a seemingly naughty chewy texture. They really do taste like a sugary treat rather than a healthy snack.

The original recipe has a layer of peanuts on the bottom as well as on the top which works well if you’re cutting them into bars, but I just put peanuts on top. Even after cooking they’re quite squidgy, so it’s better to cut them into smaller pieces to avoid a sticky mess particularly with little ones.

Because of their squidgy soft texture, I think this recipe would also be great as pop-in-the-mouth balls, rolled in crushed peanuts before baking.

You really must try making these addictive bites!

SUGAR-FREE PEANUT AND DATE BITES

Prep time: 10 mins
Cook time: 10 mins plus 30 mins in the fridge to harden
Makes 16 squares
Keeps in the fridge for a couple of days

1 1/2 cups unsalted peanuts
1 1/2 cups dates, roughly chopped

Heat your oven to 175C and line a square baking tin (mine is 20cm x 20cm) with baking paper.

Put 1 cup of the peanuts in a food processor and grind until they’re fairly evenly broken up into small pieces.

Add the chopped dates and blend while pouring in two tablespoons of water. Keep adding a little water until you have a thick paste (similar in consistency to a thick peanut butter).

Spread the date and peanut mixture into your prepared tin using the back of a spoon (wet it if the mixture keeps sticking to it). Sprinkle over the remaining 1/2 cup of peanuts and press them in.

Bake for 10 minutes.

Put the bites, still in the tin, in the fridge to harden (at least half an hour) then cut into squares.

vegan

Baked vegetable bites

These vegetable bites are really a variation of my zucchini (courgette) bites, with more veg thrown in! They’re great for using up vegetables lurking in your fridge (you can really use almost anything), and leftover bites can go into tomorrow’s lunchboxes or frozen for another day.

baked vegetable bitesSince coming up with our leftover veggie pops (or ‘cheesy lollipops’ as Nicholas calls them), I often put food on sticks. If you have a fussy eater, I would definitely try putting food they don’t particularly like on sticks.

For littler ones, especially those doing baby-led weaning, these bites are the perfect size for little fingers to pick up and feed themselves.

The bites are baked rather than fried, which not only means they’re healthier but you can throw them in the oven and forget about them for a while instead of standing in front of a frying pan turning them over. Sometimes before baking them I roll the balls into some extra breadcrumbs so they end up with a thin crunchy coating.

Don’t worry too much about exact quantities. If the mixture is too wet to shape into balls, just add some more breadcrumbs; if it’s too dry, add a little bit more beaten egg.

baked vegetable bites 2BAKED VEGETABLE BITES

Prep time: 10 mins
Cook time: 15-18 mins
Makes about 16 bites
Freezable

1 medium-large zucchini/courgette, finely grated and squeezed
1 medium carrot, finely grated
1 handful spinach, finely shredded
1 egg
1/4 cup grated cheddar cheese
1/4 cup dry breadcrumbs
Pinch of salt (optional)
Extra dry breadcrumbs for coating (optional)

Heat oven to 200C and line a baking tray with baking paper.

Put all the ingredients into a medium-sized bowl and mix until combined.

Shape into small balls (adding some more breadcrumbs if the mixture is too wet). Roll balls in the extra breadcrumbs if using.

Place on the lined baking tray and bake for 15-18 minutes until golden brown.