RSS Feed

Category Archives: family

Margaritas – a healthier version

We’ve had a surprising number of sunny days in the UK. Fingers crossed it continues for the rest of summer!

When we’re able, enjoying being outdoors in the garden fills me with happiness and tops up my energy levels, and nothing feels more deserved than relaxing with a lovely cold drink after playing and running around with Nicholas.

Hubby is the cocktail king (I don’t think I’ve ever used any of our cocktail-making gadgets!) and makes the most luscious drinks so there’s no need for me to even contemplate trying. But, when I came across Cookie and Kate’s Skinny Margarita I knew I had to give it a try.

To make their margarita ‘skinny’, Cookie and Kate replace the traditional Cointreau with freshly squeezed orange juice, thereby lowering the amount of alcohol while adding some natural sweetness. They also add some more sweetness with agave nectar, avoiding the refined sugar some people like to add to the mix.

I prefer maple syrup so that’s what I used to add some more sweetness, as well as convert their American measures to English ones.

This margarita is tart, very refreshing and oh so satisfying. I was very tempted to make another one immediately!

healthier_skinny_margarita

Margaritas – a healthier version
(adapted from Cookie and Kate)

Prep time: 10 mins
Serves 1

Sea salt
60 ml blanco or silver tequila
50 ml fresh lime juice (about 1 1/2 limes)
30 ml fresh orange juice (about 1/2 a medium orange)
1 tsp maple syrup (or agave nectar)
1 lime wedge (or wheel) to garnish

Chill your glass by either putting it in the freezer or filling it with ice while you juice your limes and orange.

Pour a little salt onto a small plate just a little bigger than the rim of your glass. Slice off a small piece of lime and run it around the rim of your glass to moisten it. Dip the rim of the glass lightly into the salt (if you don’t like too much salt with your margarita, only dip half of the rim).

Fill your cocktail shaker with ice . Pour in the tequila, lime juice, orange juice and maple syrup.

Put on the lid and shake for 30 seconds.

Double strain the mix into your glass and garnish with the lime wedge.

Sit back, relax and enjoy!

Tip: Use a good quality tequila. In a classic margarita only a blanco (white) tequila, also called silver or plata, is used.

What’s your favourite refreshing drink when the weather is sunny?

Greek Chicken Tava

Christmas is fast approaching and I’m super excited that family and friends are coming to us this year. I LOVE Christmas, but have never had the chance to organise it myself.

Of course having family to stay means also feeding them before and after Christmas day, so I’ve been researching, making lists and trying out recipes that easily feed a large number of people. There’s going to be 9 of us to feed for two weeks!

Honest Mum

The gorgeous Honest Mum’s Greek Chicken Tava (actually her mum’s recipe) ticks all the boxes. Quick to prepare, everything thrown into one baking dish (less washing up) and roasted in the oven so you can forget about it while it cooks and get on with other things. And on top of that, it’s delicious, warming and filling, and also easily doubled (or tripled!). The perfect easy (and healthy) family meal.

I also love that you can add pretty much any vegetables you have on hand. Vicki’s mum uses onions, potatoes, courgettes/zucchini, carrots and tomatoes. I’ve made this several times now and also tried peppers/capsicum, parsnip and beetroot. Basically any vegetable that’s yummy roasted is fine to add.

Vicki’s mum uses slices of large fresh tomatoes. I tend to throw in small vine tomatoes (still on the vine) as I love their pops of freshness when you eat them. I also tend to leave out the chilli simply because Nicholas can love spice one day and hate it the next, and it’s still really tasty without it. I also use dried oregano instead of fresh.

A brilliant dish whether you have a large family to feed or just deserve some more time to yourself instead of slaving over the stove!

Greek Chicken Tava

Prep time: 10-15 mins
Cook time: 50 mins
Serves 4

750g new or Maris Piper potatoes, unpeeled, chopped into small pieces
8 medium chicken thighs, on the bone and skin on
2 onions, quartered
2 courgettes, sliced
2 carrots, chopped
2 large tomatoes and/or 400g can diced tomatoes
3 garlic cloves, crushed
1 small fresh red chilli, chopped
40ml (2 tbsp) olive oil
40ml red wine (optional)
sea salt and freshly ground pepper
2 tsp cumin
1 tbsp chopped fresh oregano (or dried)
flat-leaf parsley, chopped, to serve

Preheat oven to 200°C

In a large baking dish or tray, add the potatoes, chicken, onion and vegetables, tomatoes, garlic and chilli. Drizzle with the olive oil and add the wine (if using). Season and sprinkle with cumin and oregano.

Bake for 50 minutes, checking on the chicken and turning if necessary.

Serve with a sprinkling of parsley.

Aussie saltbush damper

This week’s Great British Bake Off was all about bread, something I have a love/hate relationship with when it comes to baking it.

I used to love baking bread and wasn’t too bad at it, then came a period where it never seemed to go right. The only bread I tend to make at the moment are these bread rolls which are super easy and very slightly adapted from my friend Barbara’s recipe. If you’re at all interested in baking bread you must check our her wonderful blog all about bread and things that accompany it.

I tried to face my bread demons with an attempt at baking an amazingly pink beetroot bread. What I learnt was I must always check the type of yeast I’m using and how it’s meant to be activated! My bread was a fabulous colour but didn’t rise properly and so didn’t cook properly.
My beetroot bread failure

I wasn’t sure I’d manage to try some more bread as we’re going on holidays at the weekend, so there’s the usual pre-holiday panic of packing and getting on top of work. But when I was putting away the Aussie herbs and spices hubby brought back from a business trip quite a while ago, the jar of saltbush caught my eye, in particular when I read the label explaining its use in damper.

Damper is a traditional Australian bread, typically baked in the coals of a campfire and gets its name because the fire is damped to then cook the bread amongst the hot coals. Damper can also be wrapped around a stick and cooked over a fire.

Originally made by stockman who might be in the outback for weeks or months with only basic provisions, it consisted simply of flour and water without any raising agent. Now people tend to use self-raising flour or add baking powder, as well as add butter and milk to the dough.

Saltbush is a very hardy long-living shrub that doesn’t mind droughts and is very common in the dry inland of Australia. As its name suggests, its dried leaves have a salty ‘herby’ taste which were used in the past along with the ground roasted seeds by indigenous Australians mainly to flavour damper.

I decided to do a dairy-free take on a modern damper recipe using the saltbush for an authentic outback flavour.

dairy-free

AUSSIE SALTBUSH DAMPER

Prep time: 10 mins
Cook time: 30-35 mins
Makes 8 servings

250g plain self-raising flour
200g wholemeal self-raising flour
2 tsp saltbush
1 tsp salt
100ml oil (I used extra virgin olive oil)
300ml cold water
1/4 tsp saltbush, extra

Heat the oven to 200C and line an oven tray with baking paper.

In a food processor, combine the plain and wholemeal flours, saltbush, salt and oil until the oil is fairly evenly distributed.

With the motor running, pour in the water a little at a time until the dough has just come together in a ball (you might not need all the water).

Tip the dough out onto a floured surface and very briefly knead (about 1 minute) then form into a round shape.

Place the dough onto your prepared tray. Dip a sharp knife into flour and score the top in a star pattern to create 8 wedges. Sprinkle the extra saltbush over the top.

Bake for 30-35 minutes until lightly golden and when you tap the bottom it sounds hollow.

Cool on a wire rack for a few minutes.

Best eaten warm as a large chunk in your hand, with lashings of butter and perhaps some good cheese or a bowl of soup on the side.
dairy-free damper bread

Variations:

  • omit the saltbush (difficult to get outside Australia) and replace with chopped fresh rosemary
  • sprinkle with Parmesan before baking
  • add chunks of cheese to the dough when kneading for a cheesy damper
  • use beer instead of the water to get a yeasty flavour
  • use your hands instead of the food processor to mix the dough (great for little ones to get involved)

Please share some of your easy/foolproof bread recipes so I can beat my bread demon!

I’m joining in with the Great Bloggers Bake Off. Visit Mummy Mishaps to see some more successful attempts than mine at leavened bread!
gbbo-badgesmallI’m also linking up to Supergolden Bake’s #CookBlogShare party.
cookblogshare

Cheesy spinach crackers

Week two of the Great British Bake Off was all about biscuits and this was the perfect excuse for me to revisit making savoury crackers.
the crackers say it all!

I don’t make these Wholemeal Wheat Thins nearly enough, especially when we’re all big cracker fans, and since I first made them I’ve wanted to try adapting the recipe to use olive oil instead of butter to be a bit healthier.

I’ve made these crackers using both fresh and frozen spinach with the same great result. If you’re using frozen spinach, run it under cold water for a minute or two to defrost and then squeeze as much liquid out as you can before putting it into your food processor.

The preparation is super quick and easy – just throw everything into your food processor! What will take up most of your preparation time is rolling and cutting.

cheesy spinach crackersThe secret to getting a lovely crisp cracker is to roll out the dough as thinly as possible (2-3mm is ideal).

Nicholas and I had lots of fun cutting out different shapes – small letters, circles and wavy rectangles. Small fiddly shapes can be time-consuming (although kids will love them), but even cutting random straight lines across the dough will give you some fun shapes.

If you get sick of rolling and cutting, the dough freezes very well!
cheesy spinach crackers

CHEESY SPINACH CRACKERS

Prep time: 15-20 mins
Cook time: 5-10 mins (depending on the size of the crackers)
Makes about 120 Ritz-size crackers
Store in an airtight container for up to a week

100g spinach
200g grated cheddar
150g wholemeal plain flour
1/2 tsp salt
60ml extra virgin olive oil

Heat the oven to 200C and line an oven tray with baking paper.

Put the spinach into a food processor and blend until evenly broken up.

Add the rest of the ingredients and blend until the mixture comes together into a ball.

Take the dough out of the processor and divide it in half. Roll out one half of the dough as thinly as you can (I put the dough between two pieces of cling film to avoid it sticking to the bench or rolling pin, which saves on cleaning up time!). The thinner you can roll it, the crisper your thins will be.

Cut out shapes using a cookie cutters or a pastry wheel.

Place the shapes close together on your prepared tray and use a skewer or toothpick to poke some holes into each one to stop them puffing up.

Bake for 7 – 10 mins until golden brown and crisp (keep a close eye on them as they cook quickly).

Variations:

  • use white plain flour for a lighter textured cracker
  • omit the cheese for a dairy-free cracker
  • add onion or garlic powder to the mixture
  • add some dried herbs such as thyme, sage or rosemary to the mixture

Tip: if your stored crackers start getting soft, pop them back into the oven to crisp up for a couple of minutes.

To join in the Great Bloggers Bake Off or to see the other baking efforts, visit Mummy Mishaps.
gbbo-badgesmall

I’m also linking up to Supergolden Bake’s #CookBlogShare party.
cookblogshare


Lemon Myrtle Swiss Roll

The Great British Bake Off is back on which makes me very happy, and this year I wanted to do something I didn’t get round to last year – join in the Great Bloggers’ Bake Off run by Jenny at Mummy Mishaps.

The idea is to bake something inspired by the challenges on that week’s show, whether copying a recipe done or coming up with something yourself. This week was Swiss rolls, Mary Berry’s cherry cake and miniature British classics.

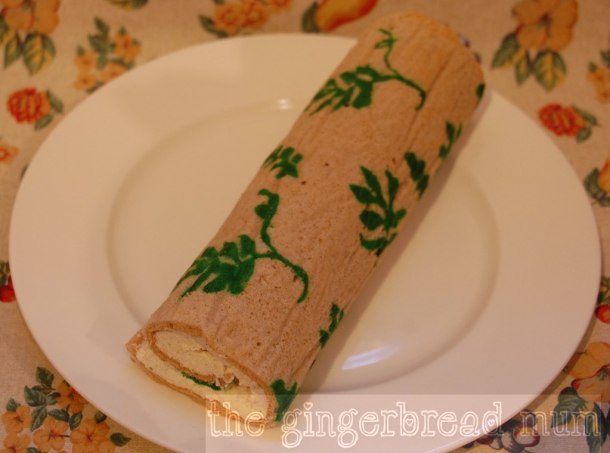
As soon as I saw some of the contestants making coloured patterned Swiss rolls, I knew that’s what I wanted to try!

I’ve seen some of my favourite foodie bloggers making the cutest Swiss rolls using silicon templates like these:
cute Swiss roll silicon sheetsAnd what Minion fan wouldn’t love to eat these?!?
minnion-cake-rolls-cupcakepedia

Absolutely amazing, but I didn’t want to be overly ambitious as each separate colour you use adds to the preparation time (and my piping skills leave a lot to be desired!). You do the pattern first, one colour at at time, either freezing the batter, or cooking it for a very short time, to set it in place and stop it bleeding into the rest of the roll. You then pour the rest of the batter over the top and cook the whole sponge.

Patterned Swiss roll decided, but what about the flavour? I wanted to do something a bit different. When I saw my lovely blogger friend Blue’s creation inspired by her childhood memory of an Aussie honey roll with the twist of lavender, I remembered the Australian herbs and spices my wonderful hubby brought back from a work trip to Melbourne. Powdered lemon myrtle was the first one I pulled out and my decision was made.

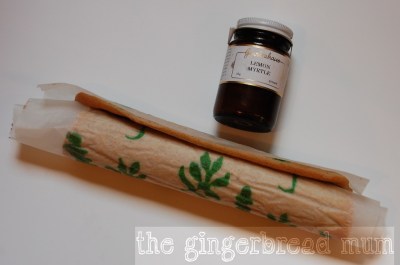
You can learn more about lemon myrtle here and I’ve found it to buy in the UK here. It has the most amazingly strong lemon aroma and you really get the sense of it being a wild bush plant when you taste it in something. However, you can substitute it with lemongrass powder or lemon verbena for a similar more earthy lemon flavour.

I used my husband’s Swiss roll recipe converting his very easy to remember ‘3-3-3’ formula (3 dessert spoons of plain flour, 3 dessert spoons of sugar and 3 eggs) to grams. His Swiss rolls always turn out wonderfully light using just the whisked egg whites to make it fluffy; unfortunately mine didn’t. Whisking the egg whites a bit to make the batter for the pattern, waiting for that to freeze and then whisking the whites again to fold into the main batter didn’t work that well (and hubby wasn’t impressed!). Next time I do a patterned Swiss roll I’ll use self-raising flour to produce a more stable batter.

Great British Bake Off

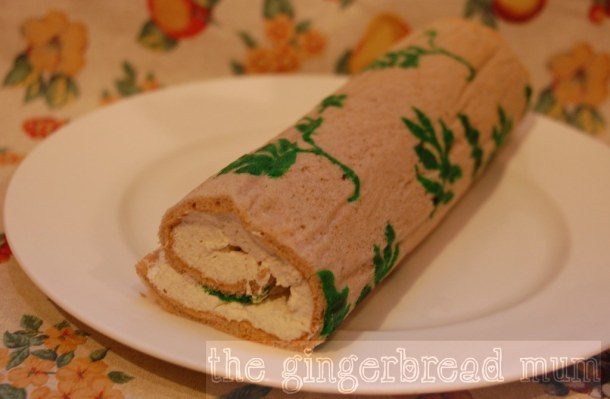
LEMON MYRTLE SWISS ROLL

Prep time: 30 mins plus 15 mins freezer time to set your pattern
Cook time: 8-10 mins
Makes one roll

3 eggs
50g caster sugar
50g plain flour
1 tsp ground lemon myrtle
small amount of green food colouring gel

For the cream filling:
200ml double (or whipping) cream
1 tsp ground lemon myrtle
2 tsp caster sugar

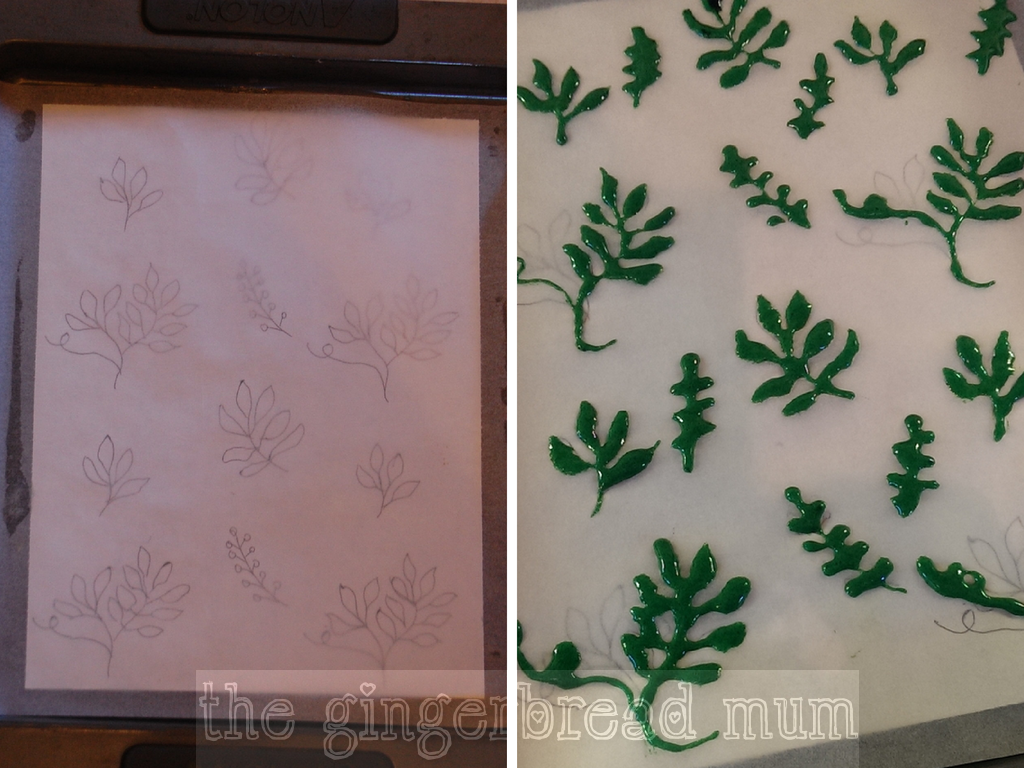
Draw your leaf pattern on a piece of paper slightly smaller than your baking tray. Place it on your tray and cover with a piece of baking paper. (If the baking paper doesn’t stay flat, dab a little butter on the tray around your paper pattern and use it to stick the baking paper in place.)

Separate the eggs putting the yolks into a medium-sized mixing bowl and the whites into a bowl big enough to beat them (a metal one is supposedly better for beating egg whites).

Add the 50g of caster sugar to the egg yolks and beat by hand with a whisk until it’s turned a paler colour. Keep beating and add the flour a spoonful at a time and then the lemon myrtle.

Put 2 tablespoons of the egg and flour mix in a small bowl and add a very small amount of food colouring gel to get your required shade.

Using an electric beater, whisk the eggs whites until soft peaks have just started to form.

Add 2 tablespoons of the whisked egg whites to the sponge batter you put in the smaller bowl and mix together (you don’t need to worry about the whites collapsing). Keep adding egg white until you have a fairly runny mixture similar to the consistency of single cream.

Put in a small clean resealable bag and squeeze the mixture to a bottom corner. Snip the corner off (it needs to be very small!) and pipe your design onto your prepared tray using your pattern as a guide.
My template and my simpler piped leaves

Put your tray into the freezer for 15 minutes.

Preheat your oven to 175C.

Just before you take your tray out of the freezer, whip your remaining egg whites a little bit more until you just have firm peaks. Add about a third of the egg whites to the remaining sponge batter and thoroughly mix.

Take your tray out of the freezer.

Gently fold the rest of the egg whites into the sponge batter and pour the batter into your tray using a spatula to very gently cover your design without smudging it.

Bake for 8-10 minutes until lightly golden brown.

Keeping the sponge on the baking paper, roll it up tightly while it’s still warm and leave to cool.
lemon myrtle

To make the cream filling, whip the double cream, lemon myrtle and sugar until stiff.

When the sponge has cooled, gently unwrap it and peel off the baking paper.

Trim the sides and spread the cream over the sponge (putting slightly more at the end you’ll start rolling it up and slightly less at the other).

Roll up the sponge as tightly as you can and trim the end just before you finish rolling. Chill in the fridge to firm up for at least an hour.

Great British Bake Off

What pattern would you try on a Swiss roll? Something for a birthday or Christmas perhaps?

To join in the Great Bloggers Bake Off or to see the other baking efforts, visit Mummy Mishaps.

gbbo-badgesmallI’m also linking up with Supergolden Bake’s #CookBlogShare party.

cookblogshare


Banana and nutella muffins

Hannah at Mums’ Days has made a fabulous list of recipes to use up browning bananas. Her 10 ways to use up old bananas includes banana milkshakes and smoothies, banana gelato, banana pancakes, banana bread and also my sugar-free flapjacks (which is without a doubt the most popular recipe on my blog).

Yesterday I needed a ‘pick-me-up’ and seeing the bananas in my fruit bowl that looked like they were very close to walking to the bin on their own, I thought of Hannah’s list, especially The Londoner’s Nutella swirl banana muffins. Perfect!

Banana and nutella muffins

Even though I wanted to eat something indulgent I couldn’t help myself from trying to make Rosie’s original recipe slightly healthier. So I reduced the sugar by a third and substituted some of the white self-raising flour with wholemeal. For muffins, the slightly heavier and denser cousins of cupcakes, you can definitely get away with adding some healthier wholemeal flour.

My taste-testers made no comment about the lack of sugar (and hubby ALWAYS comments if something I make isn’t sweet enough in his opinion). The fact that very ripe bananas are super sweet, plus the addition of Nutella makes it very easy to reduce the sugar content significantly without losing the necessary sweetness needed for it still to be a sweet treat.

I do love Nutella, in particular for how little you can add of it to make something seem much more indulgent than it is. I like adding it to porridge as only half a teaspoon makes the porridge taste wonderfully chocolatey and incredibly indulgent.

When I showed the muffins going into the oven yesterday on Instagram, one of my lovely IG friends asked if I’d tried Lindt ball muffins. I’d forgotten seeing them and was very glad I had! But if you need a more indulgent muffin, why not try popping a Lindt ball into the centre rather than the Nutella; I’m sure they would be divine.

BANANA AND NUTELLA MUFFINS

Prep time: 15 mins
Cook time: 20-25 mins
Makes 12 muffins

115g unsalted butter
80g wholemeal self-raising flour
150g white self-raising flour
100g caster sugar
1/2 tsp salt
2 eggs, lightly beaten
3 very ripe bananas, peeled and mashed
1 tsp vanilla extract
4 tbsp Nutella, at room temperature

Gently melt the butter (I prefer to use the microwave) and leave to cool.

Heat the oven to 180C and lightly grease your muffin tins (or line with paper cases).

In a medium-sized mixing bowl, combine the wholemeal and white flours, the sugar and salt.

In a jug (or smaller mixing bowl), whisk together the melted butter, beaten eggs, mashed bananas and vanilla extract.

Pour the wet mixture into the dry ingredients and mix until just combined (mixing too much can make your muffins dense and chewy).

Divide the mixture evenly between the muffin tin holes (they’ll be about half to three-quarters full depending on the size of your tin). Add a small dollop of Nutella on top of each muffin and use a skewer (or knife) to swirl it through the muffin (not too much or you won’t see any swirls).
banana and Nutella muffins

Bake for 20-25 mins until golden and cooked through when tested with a skewer.

Variations:

  • instead of Nutella, place a piece of chocolate (or Lindt ball!) in the centre of each muffin before baking to make oozing chocolate banana muffins
  • add 1 tsp of ground cinnamon to the mashed banana
  • make banana and Nutella bread/cake by cooking the mixture in a loaf or cake tin

Tip: if your Nutella is still rather hard at room temperature, either place the jar into a sink of hot water or pop the jar (without its lid) in the microwave and zap at a low temperature for intervals of 10 seconds each until it’s slightly runny.

Beetroot and yogurt risotto

Beetroot is a vegetable I’ve only grown to love cooking with recently, most probably as I’ve previously written, my experience of it growing up was ready-cooked, sliced and in tins.

When it’s in season, beetroot features a lot in our weekly delivered fruit and vegetable box, and that’s encouraged me to try using it in different ways. I’ve blogged my most successful recipes to date: beetroot, feta and thyme muffins, pink (beetroot) pancakes and beetroot and yogurt dip. The dip is what got me thinking about making a beetroot risotto.

beetroot and yogurt risotto

Cook your beetroot in your preferred way (or buy it precooked to cook down on preparation time). I like wrapping them in one piece of foil and roasting them in the oven; there’s no need to trim or chop them. Once they’ve cooled, it’s easy to remove the skin. You can also cook them in the microwave.

Surprisingly, this risotto doesn’t taste overly of earthy beetroot and the yogurt gives it a lovely (healthier) richness and creaminess without adding the usual extra butter and parmesan at the end. Kids (and adults) will love the colour and Nicholas happily ate it. I used red wine to add to the colour and liked the extra depth of flavour it gave, but white wine would work just as well.

BEETROOT AND YOGURT RISOTTO

Prep time: 10 mins
Cook time: 20-25 mins
Serves 4 adults

400g cooked and peeled beetroot
1 tbsp olive oil
15g butter
1 onion, finely diced
350g risotto rice (I used Carnaroli)
250ml red wine
1 litre hot vegetable (or chicken) stock
150g Greek yogurt

Roughly chop the beetroot, put the pieces in a small food processor and blend until smooth.

Heat the oil and butter in a medium-sized pot over a medium-low heat. Add the onion and gently fry until softened.

Add the rice and quickly stir it so all the grains are coated. Add the wine and stir until it’s absorbed.

Start adding the stock a ladle at a time, letting it absorb then adding more. Keep doing this until the rice is ready (cooked but still with a little bite, about 15-20 minutes, and still moist). Remove from the heat.

Gently stir through the beetroot then the yogurt. Check for seasoning.

Tip: keep a small piece of beetroot aside and finely dice it to sprinkle over the top before serving.

What are you favourite ways of cooking with beetroot?