RSS Feed

Tag Archives: finger food

Frozen fruit pops

Frozen fruit pops

Summer has come and gone in the UK. It wasn’t a bad one at all this year, in fact I got a tan during a British summer for the first time! However I’d be lying if I said I was anything but ecstatic that we’re finally away on holiday enjoying a very hot sun on a wonderful beach.

During our summer at home, Nicholas and I got into a regular habit of going to a park a little way from home that’s much bigger than our neighbourhood ones. For warm days its paddling pool was perfect. Our ritual was paddling pool followed by a lie in the sun, moving to the large sand pit followed by all the other playground attractions. Then we’d go find the ice cream man and have a run round the park before coming home.

Of course a British summer wouldn’t be a British summer without some rain, and not just a summer shower but days of torrential rain! (I wrote my cheeky views of the summer in the UK here.)  When we couldn’t go outside and enjoy an ice lolly, we’d improvise a picnic inside and eat frozen fruit pops to make the day sunnier.

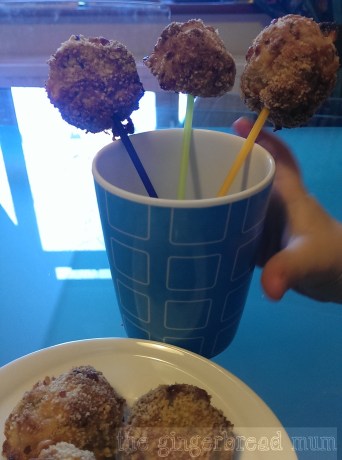
There really is nothing simpler than frozen fruit pops. Well you could just throw some fruit pieces into the freezer, but then you’d be missing the fun aspect of the stick. Why does putting food on a stick much it so much better?!?

You need plastic cake pop sticks or wooden ice lolly sticks. Don’t use wooden skewers as these can be dangerous for little ones and they’re not as easy to hold on to.

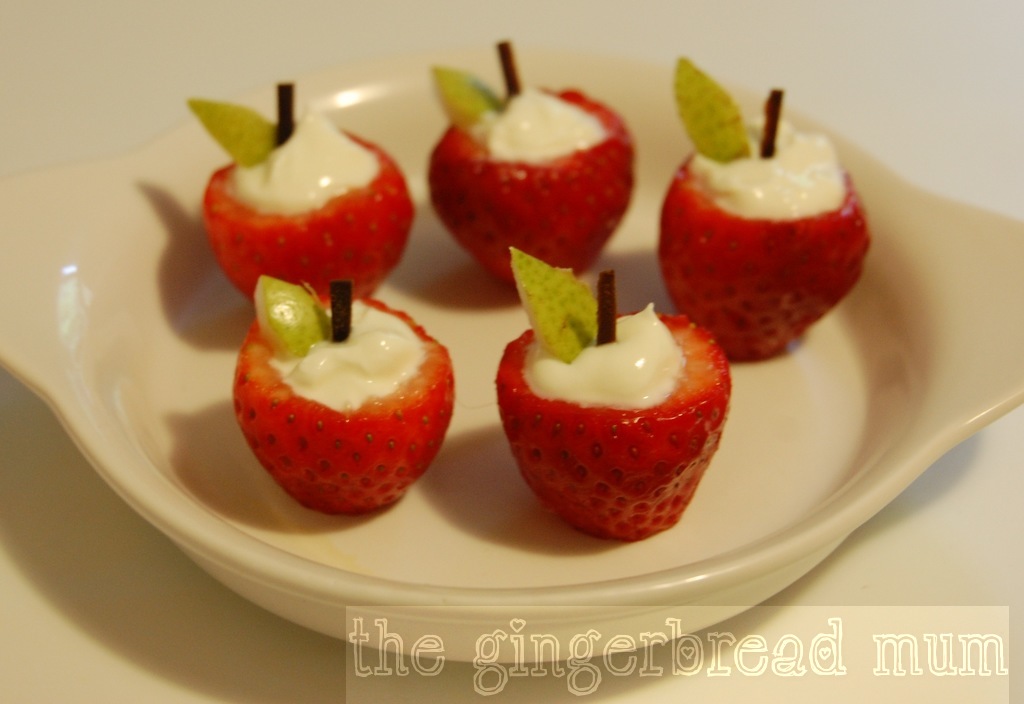
Next chop up some fruit into bite-sized pieces. We used strawberries and grapes. You can also use banana, watermelon (cut in chunks or balls), raspberries, blueberries and mango.

Thread your fruit onto the sticks, put on a freezer-proof plate or tray and put into the freezer for at least 2 hours. Once they’re frozen you can keep them all together in a freezer bag.

A healthy fun treat for summer days, or when you’re wishing for the return of summer days.

What were your favourite things to do together this summer?

Yogurt Week: Yogurt-filled strawberry apples

Yogurt Week: Yogurt-filled strawberry apples

We’re heading towards the end of Yogurt Week, but you still have until June 9th to enter the Food Stylist competition.

Yogurt Week 2014These yogurt-filled strawberries are a yummy quick snack or dessert that really aren’t any more time-consuming than chopping up strawberries and serving them with yogurt. Really!

I thought it would be fun to turn them into something else, so we have strawberry apples. Not quite in the same league as Heston Blumenthal’s meat fruit, but they’re still fun!

If you don’t want to turn your strawberries into apples, you could grate a little chocolate over the top (or simply plop a chocolate chip on top) or you could crumble a bit of biscuit over the top for a different take on a healthy strawberry cheesecake (you’re with me on the last one, right?!).

However you have them, they’re a yummy little healthy snack to pop into your mouth.

Yogurt WeekWash your strawberries and pat them dry. Slice the tops off, then using a small spoon (or the tip of a sharp knife), scoop out the inside of the strawberry. If you want them to stand up, also slice a small piece off the bottom.

Fill the hollowed out strawberries with yogurt and decorate as you prefer.

To make strawberry apples, cut out leaf shapes from a green apple or pear, and stems from licorice, and position them in the yogurt.

Eats-Amazing-Fun-Food-FridayI’m linking my yogurt-filled strawberries up to Eat’s Amazing Fun Food Friday, a weekly round up of fun and creative food.

Yogurt Week: Italian-inspired yogurt cake

Today is the first day of Yogurt Week, the UK’s first celebration of that wonderfully versatile dairy product and everything you can make with it.

Yogurt Week 2014What can’t you do with yogurt? Eat it on its own or add it to both sweet or savoury dishes, it’s a great way to add some creamy lusciousness without adding too many calories. It’s also a perfect first food for weaning babies.

With its power-boosting protein and bone-building calcium as well as a load of vitamins, it’s no wonder that in the UK we spent over £1.2 billion on yogurt in the last year (that’s £38 every second of every day!).

To celebrate yogurt, The Yogurt Council is running a Food Stylist Competition for those of you in the UK, with a £1,000 prize package up for grabs. All you need to do is create and style your own recipe using yogurt. The competition runs until Monday 9 June 2014 and more details can be found here.

Discover more about yogurt, and lots of yummy recipes using it, on the Yogurt Council’s website and follow @loveyogurtuk on Facebook, Twitter and Instagram.

Yogurt Week

Yogurt Week has been the perfect excuse for me to experiment with making something I often ate while living in Italy and have been wanting to try to make for a while.

‘Plumcake allo yogurt’ is eaten for breakfast and also as a snack for little ones. I have no idea why it’s called ‘plumcake’, especially when it has no plums (or anything resembling plums) in it! Aside from the misuse of English, this Italian yogurt cake is lovely and light, and yummy both for breakfast or afternoon tea. If you make it with low or no fat yogurt, you can have absolutely no guilt eating it for breakfast (remind yourself of the protein and calcium you’re treating your body to).

It’s an amazingly quick and easy cake to make, it’s really just beating the ingredients together, and doesn’t leave you with many dirty things to wash. It also freezes very well.

In making my Italian-inspired cake, I’ve only used ingredients that are common here in the UK. I also added some lemon zest as I like the tangy freshness it gives to the cake. (When brutally honest Italian hubby tried it, he quickly pointed out that plumcake doesn’t have lemon!) It’s just as yummy with or without the lemon; why not try both versions and tell me your favourite.

ITALIAN-INSPIRED YOGURT CAKE

Prep time: 15 mins
Cook time: 40-45 mins
Makes 1 loaf
Freezable

250g Greek yogurt
100ml light-flavoured vegetable oil (I use rapeseed oil)
zest of 1 lemon (optional)
3 eggs
140g caster sugar
200g self-raising flour
1 tsp baking powder
Pinch of salt

Preheat the oven to 175C. Line a loaf tin with baking paper.

Put the yogurt, oil and lemon zest (if using) into a medium-sized mixing bowl.

Beat the eggs until they’re light and fluffy (a hand whisk is fine), then beat them into the yogurt mixture.

Add the sugar, flour, baking powder and salt, and lightly beat until combined.

Pour the mixture into your prepared loaf tin and bake for 40-45 minutes until a skewer comes out clean.

Tip: if the top of your cake is browning too much in the oven but it’s not cooked, cover the top with a piece of aluminium foil to protect it.

By the way, can you guess what the most popular yogurt flavour is in the UK?

Disclosure: I was compensated by The Yogurt Council to develop a recipe using yogurt and promote Yogurt Week.


Sugar-free goji berry pancakes

nu3, the European nutrition experts, have just launched in the UK. Their online store has a huge range of products, including products that are exclusive to them, all to help us lead healthier lives. You can also get advice from their team of health specialists.

The company started only 5 years ago in Germany and have very quickly grown. Now we can also enjoy their huge range of health products.

As part of their UK launch, nu3 challenged me to come up with a recipe using their goji berries. Goji berries, also known as wolfberries, grow in China and are used in traditional Chinese medicine. They’re considered a superfood by many because they’re high in nutrients and antioxidents.

nu3 not only sell the dried berries, but also goji juice, goji capsules and chocolate covered goji berries. You can eat the dried goji berries simply as they are or easily pop them into smoothies or muesli and also even scatter them over salad. I experimented with adding them to cooking and I came up with some yummy pancakes.

nu3My regular readers will know I’m a big fan of fluffy pancakes so I used self-raising flour to make these pancakes lovely and light. To complement the healthy goji berries I used mainly wholemeal self-raising flour, and sweetened them with honey and very ripe banana rather than sugar (the riper the banana the better as it will be sweeter).

I felt very healthy eating them and figured I was allowed an extra drizzle of golden syrup over the top because of all the healthy ingredients inside! And Nicholas loved them too.

SUGAR-FREE GOJI BERRY PANCAKES

Prep time: 5-10 mins (plus overnight soaking time for the goji berries)
Cook time: 10-15 mins
Makes about 10 pancakes
Freezable

50g goji berries, covered in water and soaked overnight
1 1/2 cups self-raising flour (I used 1 cup of wholemeal and 1/2 cup of white self-raising flour)
1/4 tsp bicarbonate of soda
1/2 tsp ground cinnamon
1 tbsp honey
1 egg, beaten
1 very ripe banana, mashed
1 cup milk
Small piece of butter, melted, to grease the pan

Sift the flour, bicarbonate of soda and cinnamon into a medium- sized bowl.

Add the honey, egg and mashed banana then gradually pour in the milk mixing until you have a fairly thick batter (you might not need to use all the milk).

Drain the goji berries and gently mix them through the batter.

Heat a large frying pan over a medium heat and brush with melted butter. Use a tablespoon to drop spoonfuls of mixture into the pan. Cook in batches, turning when bubbles appear on the surface (1-2 mins). Cook the other side until golden brown (about 1 min). Lift out and cover with a clean tea towel to keep warm.

Variations:

  • Use nutmeg or ginger instead of cinnamon
  • Add vanilla essence for more sweetness

Tip: Wipe your pan clean with a piece of paper towel after each batch and then brush with some more melted butter.

Sugar-free peanut and date bites

While I’m not a vegan (and never could be), I like following people who are on Instagram for healthy food inspiration, especially trying to come up with different healthier snacks for Nicholas. One of my favourite vegan Instagrammers is the lovely Two Minute Vegan (@twominutevegan).

A few weeks back she came up with a great idea for a two-ingredient healthy snack bar using just dates and peanuts. I just had to try it!

veganBlending up the dates into a sticky purée produces a wonderfully sweet caramel-like flavour in the finished bites and a seemingly naughty chewy texture. They really do taste like a sugary treat rather than a healthy snack.

The original recipe has a layer of peanuts on the bottom as well as on the top which works well if you’re cutting them into bars, but I just put peanuts on top. Even after cooking they’re quite squidgy, so it’s better to cut them into smaller pieces to avoid a sticky mess particularly with little ones.

Because of their squidgy soft texture, I think this recipe would also be great as pop-in-the-mouth balls, rolled in crushed peanuts before baking.

You really must try making these addictive bites!

SUGAR-FREE PEANUT AND DATE BITES

Prep time: 10 mins
Cook time: 10 mins plus 30 mins in the fridge to harden
Makes 16 squares
Keeps in the fridge for a couple of days

1 1/2 cups unsalted peanuts
1 1/2 cups dates, roughly chopped

Heat your oven to 175C and line a square baking tin (mine is 20cm x 20cm) with baking paper.

Put 1 cup of the peanuts in a food processor and grind until they’re fairly evenly broken up into small pieces.

Add the chopped dates and blend while pouring in two tablespoons of water. Keep adding a little water until you have a thick paste (similar in consistency to a thick peanut butter).

Spread the date and peanut mixture into your prepared tin using the back of a spoon (wet it if the mixture keeps sticking to it). Sprinkle over the remaining 1/2 cup of peanuts and press them in.

Bake for 10 minutes.

Put the bites, still in the tin, in the fridge to harden (at least half an hour) then cut into squares.

vegan

Pink (Beetroot) Pancakes

Like pretty much every other toddler, Nicholas is a creature of habit. For more than a year, his breakfast had to be puffed rice cereal with milk in a yellow bowl with a particular blue spoon, together with a banana milkshake he’d often help me make, even throwing in a small handful of spinach leaves himself. Oh, and the milkshake had to be in his robot mug with two straws (usually one green and one orange). If you’re nodding your head as you read this, rather than chuckling, then I’m sure you have your own creature of habit.

But the routines that little ones so need can suddenly change to another. Now breakfast must be pancakes with a mug of cold milk. I pushed a lot for him to still have his milkshake as I loved being able to get a serving of fruit and a serving of veg so easily into him first thing every day. In hindsight my pushing was never going to work! So that has made me experiment with adding different ingredients to the pancake batter. We’ve had green pancakes (spinach) and now pink pancakes. And I’m a happier mummy knowing he’s getting a little extra dose of ‘healthy’ every morning.

beet pancakes

PINK (BEETROOT) PANCAKES

Prep time: 15 mins
Cook time: 20-25 mins
Makes about 12 medium pancakes

375ml (1 1/2 cups) full cream milk
2 tsp (10ml) lemon juice
35g (2 tbsp) sugar
225g (1 1/2 cups) self-raising flour
1/4 tsp bicarbonate of soda
1/2 tsp allspice (or 1/4 tsp cinnamon, 1/4 tsp nutmeg and a pinch of cloves)
1 large egg
30g (1 1/2 tbsp) butter, melted
1 medium-sized beetroot (about 150g), peeled and finely grated (about 1/2 cup)
Extra butter, for greasing pan

Mix the milk, lemon juice and sugar in a medium bowl, then set aside for five minutes. (It might develop a slightly curdled look during this time.)

Sift the flour and bicarbonate of soda together into a large bowl. Mix through the allspice.

Break the egg into the milk mixture and add the melted butter and grated beetroot. Whisk until the egg has combined with the milk (don’t worry it the butter just floats on the surface).

Add the milk mixture to the flour mixture and whisk quickly until almost smooth (the batter should still have a few small lumps). Don’t overmix the batter as this can make the pancakes tough. Leave the batter to rest while the pan is preheating (at least two minutes).

Heat a large non-stick frying pan over a medium heat. Melt a little butter in the pan to lightly grease it.

Give your mixture a quick stir to get a more even pink colour. Use a spoon to pour heart shapes into the pan (start with a dollop at the top then let the batter fall into the heart’s point at the bottom; repeat for the other side). Cook only two or three at a time, otherwise turning the pancakes will be difficult.

Cook the first side until small bubbles appear and burst on the surface (about 1-2 minutes).

Turn over with a spatula and cook until the second side is lightly browned and the pancakes are cooked through (another 1-2 minutes).

Cover with a clean tea towel to keep warm while you finish making the others. Add a little more butter to grease the pan each time and keep checking the temperature of the pan as it will probably need to be reduced as the pan heats up with use.

Tips:

  • Little ones love pancakes in fun shapes. You can simply use a spoon to pour the batter into a shape as you cook the pancakes, or you can put the batter into a piping bag or squeeze bottle (the squeeze bottle won’t work for these pink pancakes as the grated beetroot will get stuck in the nozzle!). An even easier way is to make normal-shaped pancakes and use a cookie cutter after they’re cooked.
  • To avoid getting beetroot juice everywhere, use disposable gloves to keep your hands stain-free and place the grater in a bowl to catch as much as the beetroot as possible.

Baked vegetable bites

These vegetable bites are really a variation of my zucchini (courgette) bites, with more veg thrown in! They’re great for using up vegetables lurking in your fridge (you can really use almost anything), and leftover bites can go into tomorrow’s lunchboxes or frozen for another day.

baked vegetable bitesSince coming up with our leftover veggie pops (or ‘cheesy lollipops’ as Nicholas calls them), I often put food on sticks. If you have a fussy eater, I would definitely try putting food they don’t particularly like on sticks.

For littler ones, especially those doing baby-led weaning, these bites are the perfect size for little fingers to pick up and feed themselves.

The bites are baked rather than fried, which not only means they’re healthier but you can throw them in the oven and forget about them for a while instead of standing in front of a frying pan turning them over. Sometimes before baking them I roll the balls into some extra breadcrumbs so they end up with a thin crunchy coating.

Don’t worry too much about exact quantities. If the mixture is too wet to shape into balls, just add some more breadcrumbs; if it’s too dry, add a little bit more beaten egg.

baked vegetable bites 2BAKED VEGETABLE BITES

Prep time: 10 mins
Cook time: 15-18 mins
Makes about 16 bites
Freezable

1 medium-large zucchini/courgette, finely grated and squeezed
1 medium carrot, finely grated
1 handful spinach, finely shredded
1 egg
1/4 cup grated cheddar cheese
1/4 cup dry breadcrumbs
Pinch of salt (optional)
Extra dry breadcrumbs for coating (optional)

Heat oven to 200C and line a baking tray with baking paper.

Put all the ingredients into a medium-sized bowl and mix until combined.

Shape into small balls (adding some more breadcrumbs if the mixture is too wet). Roll balls in the extra breadcrumbs if using.

Place on the lined baking tray and bake for 15-18 minutes until golden brown.