RSS Feed

Tag Archives: finger food

Super quick dough-free pizza

Have you ever had a craving for pizza, but couldn’t be bothered making pizza dough? In the time it will take you to pick up the phone and order one, you can make your own, much healthier, dough-free pizza from what you probably already have in your kitchen.

This great idea comes from the lovely Jennifer Cheung over at Kidspot, and I love the fact you’re getting some extra veg in your diet instead of extra carbs. They’re also the perfect size for little fingers to feed themselves.

dough-free pizza

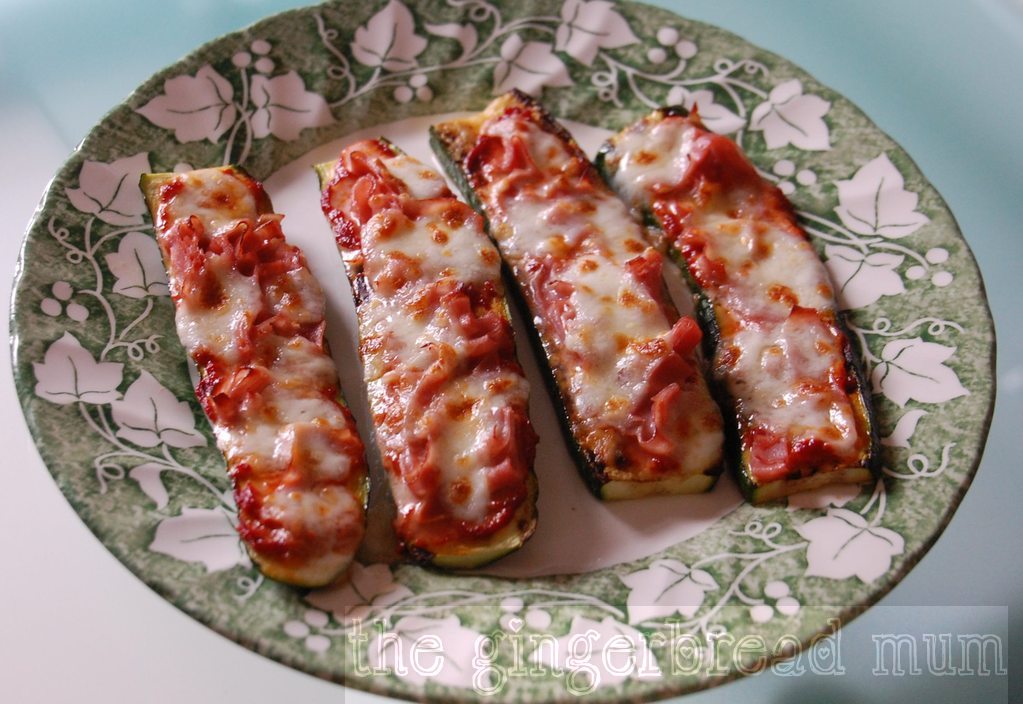
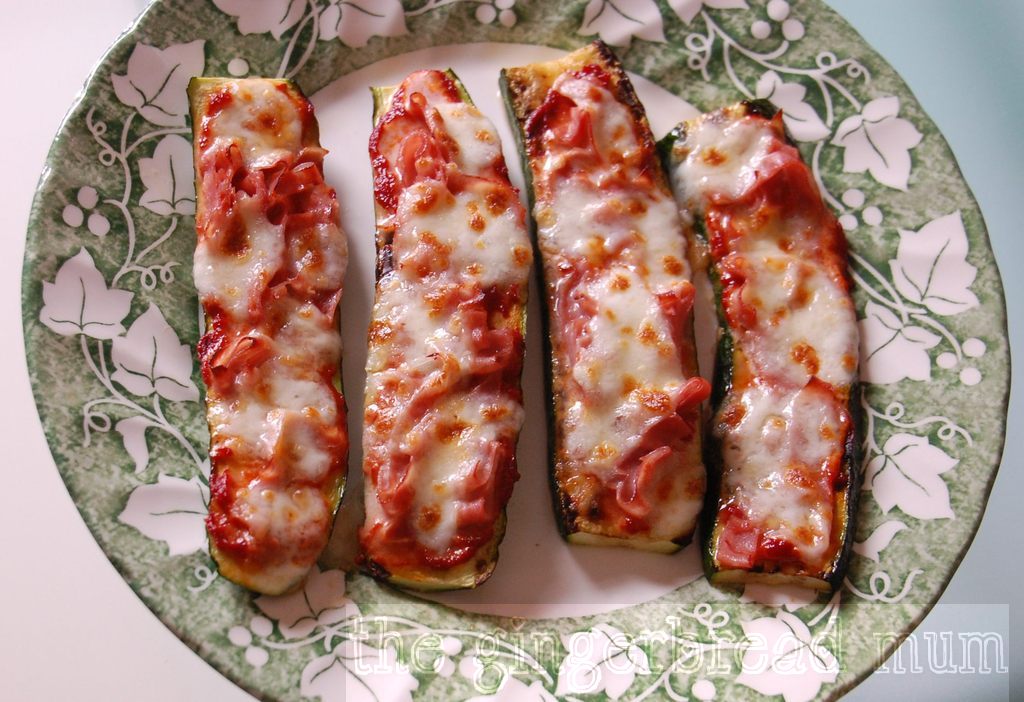
Instead of dough bases, these pizzas use slices of grilled courgette/zucchini. You could also use grilled aubergine/eggplant as the base. Toppings are entirely up to you, but be careful not to put too much on, as the vegetable bases are floppy. Why not get your munchkins to help and decide their own toppings?

The original recipe uses ready-made pasta sauce, and a ready grated and blended mix of pizza cheese, which is super convenient. I used a little tub of concentrated tomato paste and some fresh mozzarella which you just tear into small pieces with your fingers, so not that much more time-consuming.

Allow one courgette/zucchini, cut into 4 slices, per adult. Leftovers keep well in the fridge for the next day and they’d be ideal for popping into lunch boxes for a change from sandwiches.

SUPER QUICK DOUGH-FREE PIZZA

Prep time: 5 mins
Cook time: 8 – 10 mins
Makes 2 toddler servings or 1 adult serving

1 courgette/zucchini
1 tsp olive oil
4 tsp tomato paste (or ready-made pasta sauce or homemade tomato sauce)
approx. 75g fresh mozzarella, torn into small pieces
3-4 slices cooked ham, diced

Cut the ends off the courgette and then cut lengthways into 4 slices.

Heat the olive oil in a small frying pan over a med heat, and grill the courgette until just soft and golden (about 3 mins each side).

Remove from the pan. Spoon over the tomato paste or sauce, and top with ham and mozzarella. Place under a hot grill for a minute or two until the cheese is golden.

Leave to cool for a couple of minutes before serving.

dough-free pizza

Variations:

  • use slices of grilled aubergine/eggplant for the bases
  • leave out the ham for a vegetarian pizza
  • add whatever other toppings you like

What would be your perfect dough-free pizza topping?

Coconut and lime macaroons

While Easter is over, although the tempting chocolate eggs linger, I wanted to share one last Easter-inspired recipe. The great thing is you don’t need to wait until next Easter to make them. Shape them into circles or other shapes, colour them or not, and they’re a great dairy-free sweet morsel.

coconut and lime macaroon eggs

This recipe (apart from the food colouring) is an unchanged Jill Dupleix recipe and, following her food philosophy, they are a wonderfully light treat. The non-traditional lime zest and juice add a fresh zing, and contrast perfectly with the chewy coconut interior, making it easier to eat another one, and another one, and another one!

I wanted little bite-sized macaroons so I used a very small round cookie cutter approximately 4cm in diameter. I then shaped the circles into egg shapes by gently pinching the top. Jill uses the rim of a small liqueur glass to make slightly bigger macaroons. Because mine were smaller than the original recipe, they cooked quicker. Do watch them closely as they can colour very quickly at the end (as you can see in my photo!).

Nicholas had great fun helping me squish and squeeze the ingredients together with our hands. He also enjoyed cutting out the circles, but because of the sticky consistency of the mixture he needed help to get them on the baking tray.

making coconut and lime macaroons

Make them plain like the original recipe or add some food colouring for fun. We also made multi-coloured macaroons by pressing stripes of different coloured mixture together. With so few ingredients they’re perfect for your munchkin’s next cooking activity.

COCONUT AND LIME MACAROONS

Prep time: 10-15 mins
Cook time: 8-12 mins
Makes 30 bite-sized macaroons

2 egg whites
100g caster sugar
160g desiccated coconut
1 tsp grated lime (about 1/2 a lime)
1 tbsp lime juice (about 1/2 a lime)
food colouring of your choice (optional)

Preheat the oven to 180C and line a baking tray with baking paper.

Put the egg whites, sugar, coconut, lime zest and juice in a bowl, and use your hands to mix and squeeze until they lightly come together.

If using food colouring, divide you mixture into smaller bowls and add a drop or two of your desired colouring. Mix until evenly coloured.

On a piece of baking paper, press the mixture into a flat shape (about 1cm high) using wet hands.

Use a small round cookie cutter (approx. 4cm in diameter) to cut out small rounds, and place on your prepared baking tray.

Using wet hands, gently pinch the top of each circle to create oval shapes.

Bake for 8-12 minutes in the centre of the oven until just starting to colour.

Cool the macaroons on a wire rack (move them carefully as they’ll still be quite soft while they’re still warm), and store in an airtight jar.

Happy belated Easter from my own little Easter bunny!

Sweet potato crisps

sweet potato crisps

Who doesn’t like crisps? If your hand’s up, I don’t believe you!

Hubby is a big fan of vegetable crisps. So when I came across Yelena’s Orange Sweet Potato Crisps with Thyme (on her Melangery food blog) I thought both hubby and Nicholas would like them. Take a look at Yelena’s gorgeous photos and try not to drool.

The additional flavours of orange (zest) and thyme work delightfully with the sweet potato (I’m thinking of adding them when I next make sweet potato mash). But if you wanted plainer or easier crisps, you could leave them out.

If you don’t have a mandoline slicer, just make sure you slice the sweet potato as thinly as you can. I always struggle with my mandoline slicer and never get the lovely quick sliding action I see others use on cooking shows. If anyone has any tips for using them, please share!

You need to eat these fairly quickly after cooking them otherwise they’ll start losing their lovely crispiness. Although, I’m sure sticking them back into the oven for a few minutes would crisp them up again.

sweet potato crisps

SWEET POTATO CRISPS

Prep time: 10-15 mins
Cook time: 40 mins
Makes 2 servings

1 medium sweet potato, scrubbed and sliced as thinly as possible into rounds
2 tbsp olive oil
1 tsp orange zest
1 tsp thyme
salt and pepper

Preheat your oven to 160C. Line two oven trays with baking paper.

Mix the olive oil and orange zest together in a small bowl.

Using a pastry brush, brush the trays with about half of the orange oil mixture.

Lay the sweet potato slices on the tray in a single layer and brush with the remaining orange oil.

Sprinkle over the thyme, and salt and pepper.

Bake one tray at a time for about 20 mins until the edges are starting to curl up, and the centre is dry to the touch and golden brown (I let mine cook a bit too long).

Put the tray on a wire rack for the crisps to cool. After a few minutes they’ll become crisp.

Repeat with your second tray of sweet potato slices.

Eat immediately!

Dairy-free banana bread

I didn’t realise how much I used bananas in cooking until I started writing this blog! There’s banana muffinsbanana teething biscuits, banana chips, banana icecream, banana pikelets, banana and butternut squash loaf, and they’re also my ‘secret’ sweetener in my sugar-free flapjacks. And these are just the recipes I’ve blogged!

Banana is commonly one of the first solid foods a baby experiences, and I think I probably just tried different things with them as Nicholas always loves them.  I also pretty much constantly have some very ripe ones in the freezer waiting to be turned into something yummy.

I’ve tried many banana bread recipes over the years with varying degrees of success. Most of the time I prefer mine to be light and fluffy like a sponge, rather than heavy and moist. And while I adore cream cheese frosting, for me this banana bread is much better without it distracting your taste buds. It also means I feel less guilt when eating it for breakfast.

dairy-free banana bread

Banana bread recipes are quite similar overall with a different tweak here and there. My recipe isn’t anything new, but it’s evolved from combining recipes I’ve come across and experimenting until I was happy.

One thing you might want to experiment with is the texture of the mashed banana. Some cooks puree it with a blender while others leave it quite chunky. Supposedly pureeing it gives a richer banana flavour to the finished product. I mash my bananas with a fork, but mash about half of them until they’re very smooth and the remainder I only mash a little so you find the occasional chunk in the finished bread.

There’s quite a bit of banana in this recipe, but you can easily get away with less; even two smallish bananas would work fine (you want at least 175g of it unpeeled).

DAIRY-FREE BANANA BREAD

Prep time: 10-15 mins
Cook time: 40-45 mins
Freezable

175g self-raising flour
2 1/2 tsp baking powder
175g golden caster sugar
2 eggs
1/4 cup vegetable oil
2 1/2 medium bananas, mashed
50g walnuts (or pecans), chopped

Preheat the oven to 160C. Line a loaf tin with baking paper.

Whisk the sugar, eggs and oil together at a medium speed using a handheld beater or in an electric mixer. Whisk for a few minutes until it’s pale and fluffy.

Sift in the flour and baking powder, add the mashed banana, and mix until combined using a low speed. Gently stir through the walnuts.

Pour into your prepared tin and bake for 40-45 minutes until a skewer comes out clean.

Variations:

  • Make individual muffins instead of a loaf (easier to freeze if you’re not going to eat all of it)
  • Dust with icing sugar
  • Top with cream cheese frosting for a more decadent loaf

dairy-free banana breadI’m linking up this recipe to the One Ingredient Challenge hosted by Franglais Kitchen and How to Cook Good Food. Why not enter your own banana recipe and join the linky party? Read the rules here.

Spiced carrot muffins

spiced carrot muffins

Nicholas loves making and eating ‘muffles’ (that’s muffins to you and I!). I’m not sure he understands that what he’s stuffing into his mouth are the fruits of his zealous stirring and pouring, but that doesn’t matter; we both like eating them.

While these muffins aren’t sugar-free, I have reduced the sugar a lot. With the healthy carrot, seeds and sweet raisins inside, as well as some wholemeal flour, I think the amount of sugar is ok. And adding a pinch of extra sugar on the top makes them seem much sweeter than they are 😉

You can easily leave out the seeds, but I like the different texture they add to the muffins. I also like sprinking a few more over the tops before baking.

SPICED CARROT MUFFINS

Prep time: 10-15 mins
Cook time: 18-20 mins
Makes 12 regular-sized muffins
Freezable

150g white self-raising flour
100g wholemeal self-raising flour
75g golden caster sugar
1 tsp baking powder
1 tsp ground cinnamon
1/2 tsp ground ginger
1/4 tsp nutmeg
30g raisins
20g pumpkin seeds
20g sunflower seeds
125ml vegetable oil
125ml milk
1 egg
1 large carrot, grated
Extra golden caster sugar for sprinkling

Preheat the  oven to 180C and grease your muffin tin with a little oil or cooking spray (or line your tin with paper cases to avoid washing the tin).

In a medium-sized bowl, mix the white and wholemeal flours, the caster sugar, baking powder, cinnamon, ginger and nutmeg. Stir in the raisins, pumpkin seeds and sunflower seeds, until evenly distributed.

In a jug or another bowl, whisk the oil, milk and egg together. Squeeze the excess liquid from the grated carrot and stir it through the milk mixture.

Pour the milk mixture into the dry ingredients and mix until just combined (mixing too much will make your muffins heavy and dense).

Pour into prepared tin and bake for 18-20 mins until golden on top and cooked through when tested with a skewer.

spiced carrot muffins

Variations:

  • add chopped walnuts or pecans instead of the pumpkin and sunflower seeds

Tip: soak the raisins in hot water for about 10 minutes beforehand to become plumper and avoid them drying out while cooking.

Happy 2013 (and how to use up Christmas candy canes)

During our lovely long and sunny holiday on the other side of the world, I enjoyed being relatively technology free. Forgive me if it takes me a little while to get back into the swing of things. Going from hot days at the beach to waking up this morning to a fine layer of snow is difficult!

If, like me, you’re struggling to go back to your routine, why not hold on to some Christmas cheer for just a bit more by making my Christmas candy cane balls. You probably have some candy canes left over and these are a great way to use them up (and they taste yummy too, even if I do say so myself!). There’s no cooking involved, have only three main ingredients (plus some coconut for rolling them in) and kids will love bashing up the candy canes.

Candy cane balls

My recipe is over at Mindful Mum.

Mini pizzas (pizzettas)

Nicholas loves pizza. Does any child not love pizza? So I thought, let’s try making it together for our next cooking adventure. There’s lots of fun to be had rolling and shaping the dough, and then there’s the toppings.

I prepared the dough on my own, then involved Nicholas in making the mini pizza bases. He has a little plastic roller that was absolutely perfect for rolling out the dough, so perfect in fact we kind of fought over who used it! I’d already prepared some toppings in separate little plastic bowls ready for sprinkling over the bases, but the dough was much more interesting and Nicholas left the topping selection up to me. Perhaps he’ll be more interested next time.

mini pizzas

On the subject of pizza dough, hubby is always searching for the perfect recipe. The leftovers of his quest are lurking in the dark corners of our freezer. I’m not convinced he’ll find his pizza ‘grail’, but don’t tell him that otherwise I won’t get to eat his experiments.

Not being Italian, I’m not so fussy with my pizza dough. And I also have this theory that if you make your bases as thin as you can, you can be almost guaranteed your pizza will be yummy (I have to whisper this next bit: even without using the proper Italian flour).

If you’re making these with your munchkin, use toppings they like. And remember that children generally like their food very colourful, much more than us boring adults. We topped our pizzettas with a little tomato puree, grated courgette/zucchini, pieces of buffalo mozzarella and diced fresh tomatoes. Oh, and no matter what you put on top, a final drizzle of olive oil over the top makes them perfect.

MINI PIZZAS

Prep time: 1 hr 40 mins (for dough to rise twice)
Cook time: 5-10 mins
Makes about 30 mini pizzas or 2 medium pizzas
Uncooked dough can be frozen

7 g dried yeast
1/4 cup warm water
2 cups strong white bread flour such as “OO” flour
1/2 tsp salt
1 1/2 tbsp olive oil
1/2 cup cold water
A handful of semolina (optional)

Put the warm water in a small bowl and add the yeast. Leave for 15 mins for it to froth up.

In a large bowl, mix the flour, salt, olive oil and cold water. Add the yeast mixture and mix until it comes together in a ball.

Knead the dough on a floured work surface for about 5 mins. It should feel elastic and soft, and be a bit sticky.

Put the dough back into the bowl, cover and leave to prove for 20 mins.

Divide the dough into two, place the second piece in another bowl, cover both and leave to prove again for an hour (the dough should double in size).

Heat oven to 220C and leave the tray you’ll use (preferably a heavy-based one) inside to heat up (this helps cook the bottom of the pizzas).

Lightly flour your work bench and roll out one piece of the dough as thin as you can. Use a round cookie or scone cutter to cut out your shapes and try to tease each circle a little more with your fingers to make it even thinner.

Lightly cover a cutting board with semolina, place your pizza bases on top and then add your toppings. Finish with a drizzle of olive oil. Open the oven and bring the hot tray out enough so you can  sprinkle on some more semolina and slide the pizzas from the cutting board on to the tray (the semolina helps the pizzas move more easily).

The time it takes to cook your pizza depends on the thickness of your dough and the amount of toppings you’ve put on. As a guide, check after 5 mins. They’re done when the dough is golden brown on the edges, and the cheese is bubbling and just starting to turn golden.

Finish with some torn pieces of fresh basil.

mini pizzas