RSS Feed

Category Archives: family

Carrot and coriander soup

You can’t beat carrot and coriander soup. It’s simple, yummy, filling and cheap. My recipe isn’t very different to most you can find, but this is one recipe not worth experimenting with!

carrot and coriander soup

CARROT AND CORIANDER SOUP

Prep time: 10 mins
Cook time: 15-20 mins
Makes 4 adult servings

1 tbsp olive oil
1 onion, diced
500g carrots, roughly chopped
1 tsp ground coriander
1 litre hot vegetable or chicken stock
large handful fresh coriander, roughly chopped
Salt and pepper

Heat the olive oil in a large pot over a medium heat. Add the onions and carrots, and cook for about 5 minutes until the vegetables are starting to soften.

Add the ground coriander, some salt and pepper and cook for another minute.

Add the stock, bring to the boil then reduce the heat to medium-low. Cover and cook for 10-15 minutes until the carrots are soft.

Take off the heat, add the fresh coriander and purée until smooth. Check if you need to add any seasoning.

Beetroot, feta and thyme muffins

Beetroot is one of those vegetables I often think about using but never do. Perhaps it’s because growing up, beetroot only came from a can, precooked and sliced, its bright juice ready to stain as much clothing as possible on the way to your mouth. I was never a fan of its earthy flavour.

Well I can finally say I have cooked with it, although I took the easy option this time of buying it in a vacuum sealed pack already cooked (next time, next time). And I also managed to come out the other end stain-free!

Beetroot is a very good source of potassium and manganese, but while it’s very low in fat, it’s also high in natural sugars.

savoury beetroot, feta and thyme muffins

I paired the earthy flavour with feta and thyme for these savoury muffins. Feta and beetroot are a classic combination; goat’s cheese would also work well. I used a mixture of white and wholemeal flour, but you can certainly use just white flour if you prefer.

I was very happy to see my muffins still had a lovely pink hue on top when I took them from the oven (although you can’t really see that in my photos). But when I broke one apart, the inside was a normal muffin brown colour (can anyone enlighten me about this?).

BEETROOT, FETA AND THYME MUFFINS

Prep time: 15 mins
Cook time: 25-30 mins
Makes 12 regular-sized muffins

200g self-raising white flour
100g self-raising wholemeal flour
1/2 tsp baking powder
100g feta, crumbled or diced
1 tbsp fresh thyme leaves
200g cooked beetroot (1 large beetroot), finely grated
2 eggs, lightly beaten
210ml milk
90ml vegetable oil
1/2 tsp salt (optional)

Preheat the oven to 200C. Either lightly spray a 12-hole muffin tray with cooking spray or line with paper cases.

Mix the white and wholemeal flours, baking powder, feta and thyme in a large bowl.

In a separate bowl or jug, combine the grated beetroot, eggs, milk, oil and salt (if using). Add this to the flour mixture, mixing until just combined (mixing as little as possible keeps your muffins light in texture).

Divide the mixture evenly between the 12 muffin holes.

Bake for 25-30 minutes until cooked through when tested with a skewer.

Tip out onto a wire cooling rack.

Savoury beetroot, feta and thyme muffins

Variations:

  • use goat’s cheese instead of feta.
  • if you don’t have any fresh or dried thyme, substitute with chives or parsley.

Tip: to avoid getting beetroot juice all over your kitchen when grating it, put your grater into a good-sized bowl to catch the juice and wayward pieces as you grate.


Sugar-free Anzac biscuits

Tomorrow (25th of April) is ANZAC Day. The word ‘ANZAC’ (an acronym for the Australian and New Zealand Army Corps) was coined during WW1 to refer to the Aussie and Kiwi troops in Egypt. More than 10,000 of them lost their lives during the campaign to capture Gallipoli in Turkey, which saw them landing on the penisula on the 25th of April 1915. Now ANZAC Day not only remembers these WW1 soldiers but all the Australian and New Zealand men and women who have served and died in wars.

Anzac biscuits came about supposedly when the soldiers’ loved ones wanted to send them something nutritious from home. They had to send something that could withstand a couple of months travel without refrigeration and use ingredients that were readily available during the war. The traditional Anzac biscuit of rolled oats, sugar, plain flour, coconut, butter, golden syrup or treacle, bi-carbonate of soda and boiling water was born.

sugar-free Anzac biscuits

If you would like to make the traditional Anzac biscuit there are many recipes online, including this one on the ANZAC Day Commemoration Committee website and also here (with a choice of crisp or chewy biscuits).

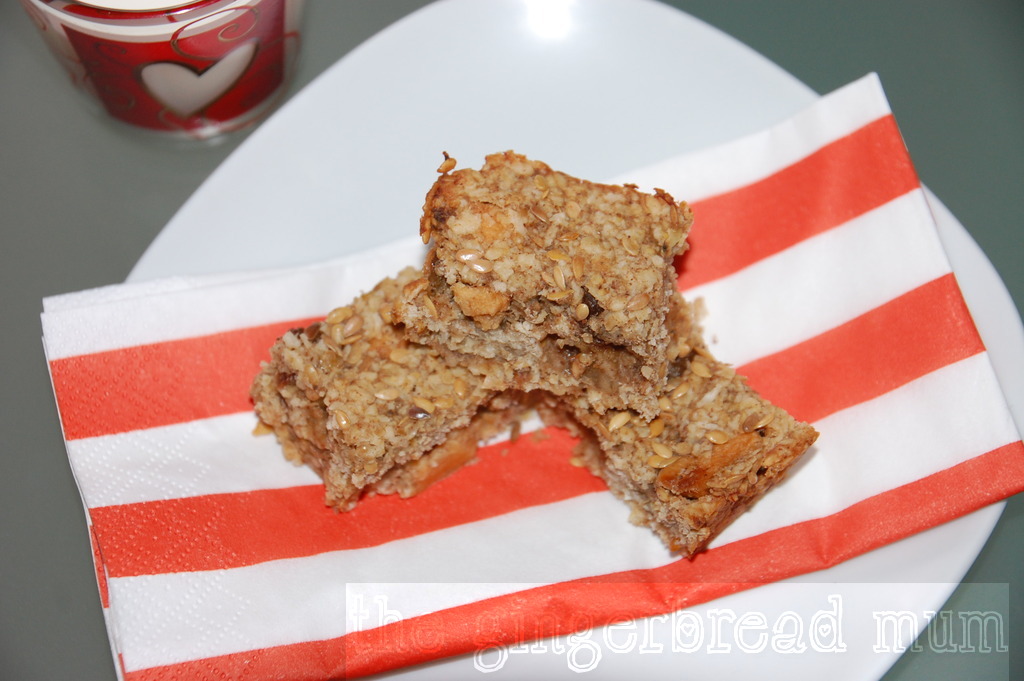
I experimented to make a sugar-free, more toddler-friendly version. Instead of the sugar and golden syrup (or treacle in some recipes), I used honey and applesauce (unsweetened pureed apple). The texture with these two substitutions produces a biscuit with a soft chewy centre, but you can make them less chewy by flattening out the biscuits as much as possible before cooking them.

They went down very well with Nicholas (he’s had them as snacks and also for breakfast, and they survive dunking in milk very well). Hubby, who usually doesn’t like my sugar-free experiments, has happily eaten them without complaint, while I’ve also scoffed a few feeling a lot less guilty than if they were packed with sugar.

This would be a great recipe to try making with your munchkins, but because of the honey it’s advised not to give these biscuits to little ones under 12 months old. It’s also a recipe that’s easy to halve if you don’t want to make so many biscuits.

SUGAR-FREE ANZAC BISCUITS

Prep time: 10 mins
Cook time: 15-20 mins
Makes about 30 biscuits

1 cup rolled oats
1 cup plain flour
3/4 cup desiccated coconut
125g butter
1/2 cup honey
1/4 cup applesauce / apple puree
1/2 tsp bicarbonate of soda
1 tbsp boiling water

Preheat the oven to 160C and line two oven trays with baking paper.

Gently melt the butter with the honey either in the microwave or in a small saucepan. Let cool.

Combine the rolled oats, plain flour and coconut.

Mix the bicarbonate of soda with the boiling water and add it to the cooled butter mixture.

Stir the butter and bicarbonate of soda mixture into the dry ingredients, add the applesauce or puree and mix until combined.

Place teaspoonfuls of the mixture (it’s normal that it’s quite runny) onto your prepared trays and flattened the mixture out (the thicker the biscuit the softer and more chewier the centre will be). Unlike traditional Anzac biscuits, these won’t spread any more during cooking.

Bake for 15-20 minutes until golden brown. Remove carefully from the trays (they’ll still be quite soft) to cool on a wire rack.

Other uses:

  • Use the biscuits as the base for individual unbaked cheesecakes: place a whole biscuit in the bottom of a muffin tin (lined with a paper case to get it out more easily), top with your preferred cheesecake mix and refrigerate.
  • Use broken up biscuits as a crumble topping for cooked fruit.

I’m linking this recipe to the AlphaBakes monthly challenge (this month it’s the letter ‘A’) jointly hosted by Ros from The More than Occasional Baker and Caroline from Caroline Makes.
AlphaBakes Logo

Spiced apple sugar-free flapjacks

My most popular recipe on the blog is my sugar-free flapjacks. Obviously lots of people want a healthier version of this popular treat.

I make my sugar-free version fairly regularly and even serve them up to unsuspecting adult guests, even though I initially invented them for littlies.

I’ve also experimented with other flavour combinations but usually forget to write them down. This variation is one I like a lot and can be made more spiced if serving it to big people. More importantly, I’ve managed to write it down!

spiced apple sugar-free flapjacks

Once again it’s sugar-free, using a little honey and mashed banana instead for sweetness. This time though, extra sweetness comes from soft dried apple and raisins rather than the original recipe’s dates. There’s also the addition of orange zest.

If you’re making this for toddlers, I would first try making the flapjacks with the smaller amounts of spice (1/2 tsp of cinnamon and 1/4 tsp of cloves) while adults will like more warming spice (1 tsp of cinnamon and 1/2 tsp of cloves).

There are lots of ingredients to mix so this is a great recipe to get your children involved.

SPICED APPLE SUGAR-FREE FLAPJACKS

Prep time: 10 mins
Cook time: 15-20 mins
Makes 16 squares

100g butter
3 tbsp honey
200g porridge oats
100g soft dried apple, chopped into pieces no bigger than 1cm
30g desiccated coconut
50g raisins
30g golden linseeds (or flaxseeds), plus extra for sprinkling on the top
1/2 – 1 tsp ground cinnamon
1/4 – 1/2 tsp ground cloves
zest of an orange, grated (or 1/2 tsp orange extract)
2 ripe bananas, mashed

Preheat oven to 175C and grease a 20cm square baking tin.

Gently melt the butter and honey either in a saucepan or in the microwave. Leave to cool.

In a large bowl, mix the oats, chopped dried apple, coconut, raisins, golden linseeds, cinnamon, cloves and orange zest together.

Add the mashed bananas to the melted butter and honey, stir to combine and then pour into the dry ingredients. Mix thoroughly.

Press the mixture firmly into your tin and sprinkle over the extra seeds.

Bake for 15-20 mins until golden on top and it’s coming away from the sides of the tin.

Take out of the oven and, while it’s still warm, use a knife to score where you will cut. Leave in the tin to cool before cutting.

spiced apple sugar-free flapjacks

Variations:

  • Make dairy-free flapjacks by replacing the butter with a dairy-free margarine

Tip: if you have fussy little ones, to avoid them pulling out pieces of dried fruit, chop the apple (maybe also the raisins) into very small pieces for a smoother and more homogeneous mix.

You might also like

The original sugar-free flapjacks (oat bars)

The original sugar-free flapjacks (oat bars)

Healthy homemade microwave popcorn

Making your own popcorn means you can snack away guilt-free whether you’re watching a movie or not. It’s healthy because unless you add other toppings, simple plain popcorn with a bit of salt is a low-calorie snack.

healthy microwave popcorn

Since learning how easy it is to make at home when I was a teenager, I’ve always made it in a pot on the stove. For making larger amounts, this is still the best way I think. Put a tablespoon of olive oil in a large pot, stir through 1/2 cup of popcorn kernels until they’re coated, put the lid on and put over a medium heat until the kernels start popping; shake the pot around putting it back on heat when the popping slows down; add salt if desired.

Of course you can buy prepackaged bags of popcorn kernels to go in the microwave. However, you’re paying lots of money for the packaging and often getting lots of added ingredients. Just buy a (much bigger) bag of simple kernels.

Making popcorn in the microwave is perfect for a quick snack or for when you just want a couple of small servings. This method uses a paper bag (think brown paper lunch bag), but you can also pop them in a large microwave-safe bowl with a plate over the top. Either way, be very careful opening the bag or bowl, keeping your fingers away from the escaping steam.

I’ve tried making microwave popcorn with oil and without. I’d encourage you to try both. Without the oil is definitely healthier, but it’s only a small amount and, for me, the taste is so much better with it.

But before we get popping…

WARNING: popcorn can be a choking hazard for babies, toddlers and even bigger children. Even if your little one has teeth, she may swallow rather than chew them. Large pieces of even the fluffiest popcorn can block a little one’s throat, and unpopped or half-popped kernels and the husks can also be very dangerous. The common advice is to not give popcorn to under twos, but some experts say avoid them until four years of age. When you think your little one is old enough to eat popcorn, break bigger pieces up, check for unpopped and half-popped kernels and husks, and have them eat sitting down and supervised.

HEALTHY HOMEMADE MICROWAVE POPCORN

Prep time: 2 mins
Cook time: 2 mins
Makes 1 adult serving

1/4 cup popcorn kernels
1 small clean paper bag such as a brown lunch bag
1/2 tsp olive oil (optional)
pinch of salt (optional)

If using oil, put it in a small bowl, add the popcorn kernels and salt (if using), and stir until the kernels are covered. If not using oil, skip to the next step.

Place the kernels in the bag. Fold the top over 2 or 3 times to close.

Place the bag in the microwave and cook for 2 minutes on high or until there’s more than 2 seconds between pops.

Be careful of the escaping steam when opening the bag.

Variations:

  • sprinkle over nutritional yeast for a low-calorie cheese flavour
  • add a pinch of cinnamon
  • add a pinch of garlic powder or onion salt

Tip: Take out the popped popcorn from the bag and microwave the unpopped kernels briefly again.

Super quick dough-free pizza

Have you ever had a craving for pizza, but couldn’t be bothered making pizza dough? In the time it will take you to pick up the phone and order one, you can make your own, much healthier, dough-free pizza from what you probably already have in your kitchen.

This great idea comes from the lovely Jennifer Cheung over at Kidspot, and I love the fact you’re getting some extra veg in your diet instead of extra carbs. They’re also the perfect size for little fingers to feed themselves.

dough-free pizza

Instead of dough bases, these pizzas use slices of grilled courgette/zucchini. You could also use grilled aubergine/eggplant as the base. Toppings are entirely up to you, but be careful not to put too much on, as the vegetable bases are floppy. Why not get your munchkins to help and decide their own toppings?

The original recipe uses ready-made pasta sauce, and a ready grated and blended mix of pizza cheese, which is super convenient. I used a little tub of concentrated tomato paste and some fresh mozzarella which you just tear into small pieces with your fingers, so not that much more time-consuming.

Allow one courgette/zucchini, cut into 4 slices, per adult. Leftovers keep well in the fridge for the next day and they’d be ideal for popping into lunch boxes for a change from sandwiches.

SUPER QUICK DOUGH-FREE PIZZA

Prep time: 5 mins
Cook time: 8 – 10 mins
Makes 2 toddler servings or 1 adult serving

1 courgette/zucchini
1 tsp olive oil
4 tsp tomato paste (or ready-made pasta sauce or homemade tomato sauce)
approx. 75g fresh mozzarella, torn into small pieces
3-4 slices cooked ham, diced

Cut the ends off the courgette and then cut lengthways into 4 slices.

Heat the olive oil in a small frying pan over a med heat, and grill the courgette until just soft and golden (about 3 mins each side).

Remove from the pan. Spoon over the tomato paste or sauce, and top with ham and mozzarella. Place under a hot grill for a minute or two until the cheese is golden.

Leave to cool for a couple of minutes before serving.

dough-free pizza

Variations:

  • use slices of grilled aubergine/eggplant for the bases
  • leave out the ham for a vegetarian pizza
  • add whatever other toppings you like

What would be your perfect dough-free pizza topping?

Roasted carrot soup for the whole family

Happy International Carrot Day! Bet you didn’t know that even though this year marks a decade of celebrating the root vegetable. I certainly didn’t!

After our Easter indulgences, I though it was time to return to my mission of getting as many vegetables into Nicholas as possible (and soup’s the least stressful way). I’m sure the exhausted Easter bunny would also happily relax with a large bowlful.

This is a super simple soup (try to say that quickly as many times as you can!) the whole family can enjoy from weaning babies (omit the seasoning) to adults. It freezes well and can also be used as a pasta sauce for a quick healthy lunch.

roasted carrot soupRoasting the carrots and onion, before adding them to the stock, creates an extra depth of flavour. Ordinary carrot soup becomes something more interesting to the palette. While roasting the vegetables means the cooking time is longer, you can always roast them earlier in the day (if you’re at home) or even the day before.

Like most soups, don’t be too worried about exact measurements; slightly less or slightly more carrots won’t make much difference to the end result. If you don’t have enough carrots, add some other root vegetables like parsnip, turnip or potato.

If you’re not serving this to a baby, you can add some warming spice like coriander (you could sprinkle some ground coriander over the vegetables before roasting).

ROASTED CARROT SOUP

Prep time: 10 mins
Cook time: 40 mins
Makes 4 adult servings
Freezable

750g carrots, roughly chopped
1 large onion, quartered
1 tbsp olive oil
1 litre vegetable or chicken stock
1 tbsp fresh thyme leaves
salt and pepper (optional)

Preheat the oven to 200C.

Lay the chopped carrots and onion in a single layer on a roasting tray. Drizzle over the oil, and season with salt and pepper (if using). Roast for 3o minutes or until the vegetables start to turn golden.

Heat the stock in a medium to large pot until lightly boiling. Turn the heat down to low, add the vegetables and thyme, and simmer for 10 minutes.

Take the soup off the heat and let it cool a little if you have the time. Purée until smooth. Check if you need to add any more seasoning.

Variations:

  • use a mixture of carrots and parsnips
  • sprinkle the vegetables with ground coriander before roasting (you can also add fresh coriander later)

Other Uses:

  • Mix through some cooked pasta (or rice) for a quick lunch